<目次>
(1) AzureのMachine Learning(機械学習)の始め方
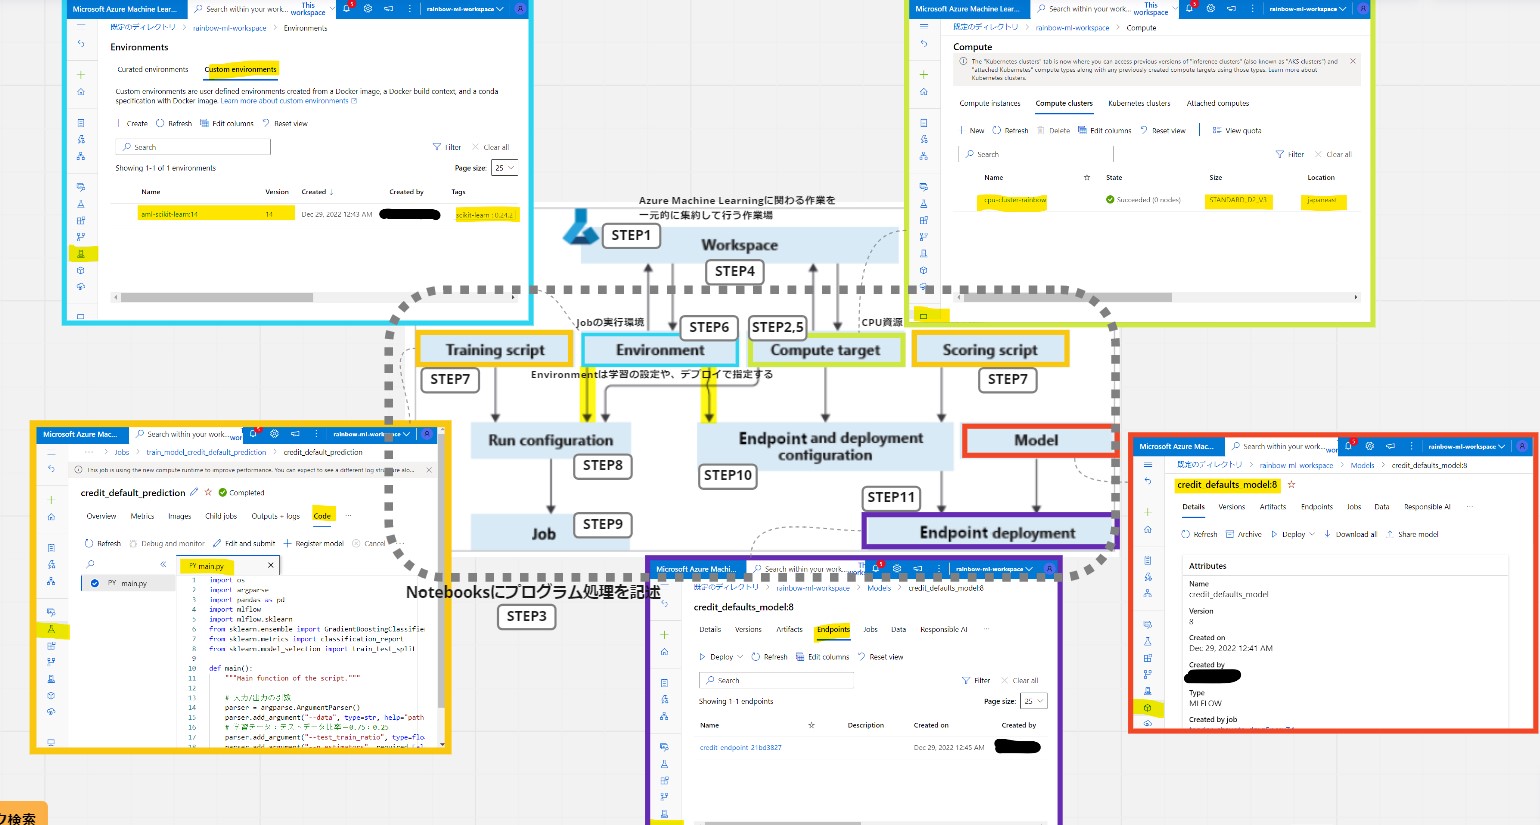
(1-0) やりたいこと
(1-1) STEP1:(事前準備)ワークスペースの作成
(1-2) STEP2:(事前準備)Compute Instanceの作成
(1-3) STEP3:(事前準備)ノートブックの作成と疎通
(1-4) STEP4:(処理記述)ワークスペースへの接続
(1-5) STEP5:(処理記述)Computeリソースの作成
(1-6) STEP6:(処理記述)ジョブのEnvironmentを作成
(1-7) STEP7:(処理記述)学習スクリプトの作成
(1-8) STEP8:(処理記述)ジョブの実行コマンドを作成
(1-9) STEP9:(処理実行)ジョブの実行/結果確認
(1-10) STEP10:(公開準備)エンドポイントの作成
(1-11) STEP11:(公開準備)エンドポイントへデプロイ
(1-12) STEP12:(公開準備)テスト
(1-13) STEP13:(後処理)リソースの削除
オマケ:APIアクセス
(1) AzureのMachine Learning(機械学習)の始め方
やりたいこと
・Azureにおける機械学習の概要を知る
・必要最低限のリソースを作り、Hello Worldをする
(図100)
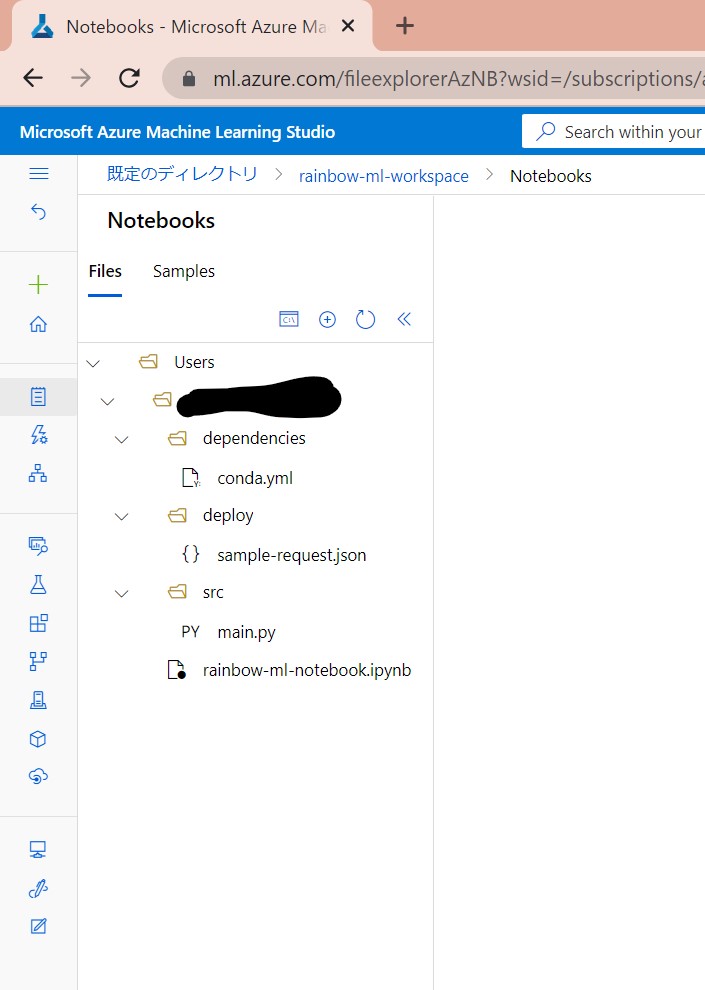
(図101)最終的なフォルダ構成
(1-1) STEP1:(事前準備)ワークスペースの作成
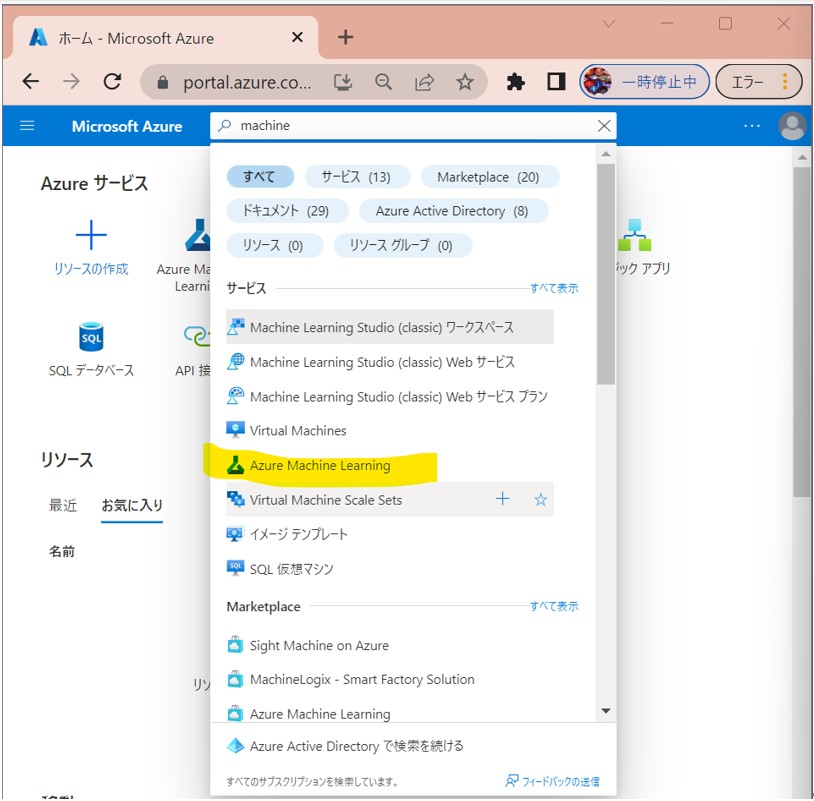
・①Machine Learning
(図111①)
↓
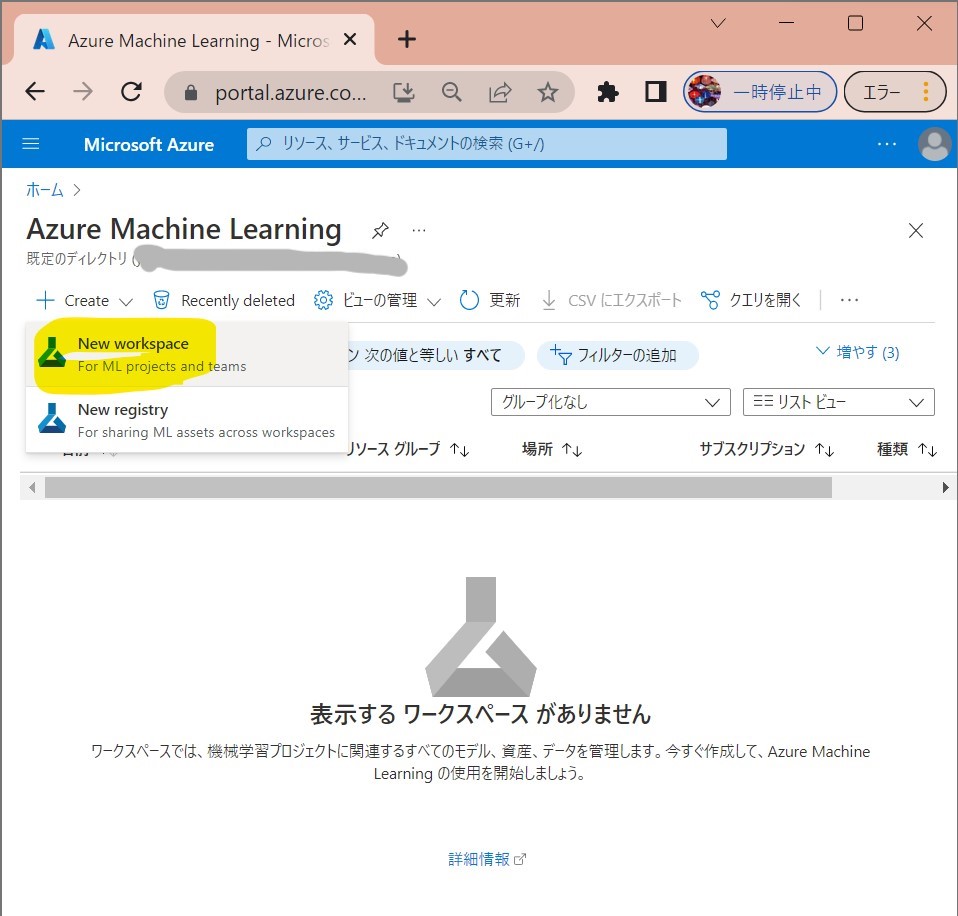
・②New Workspace
(図111②)
↓
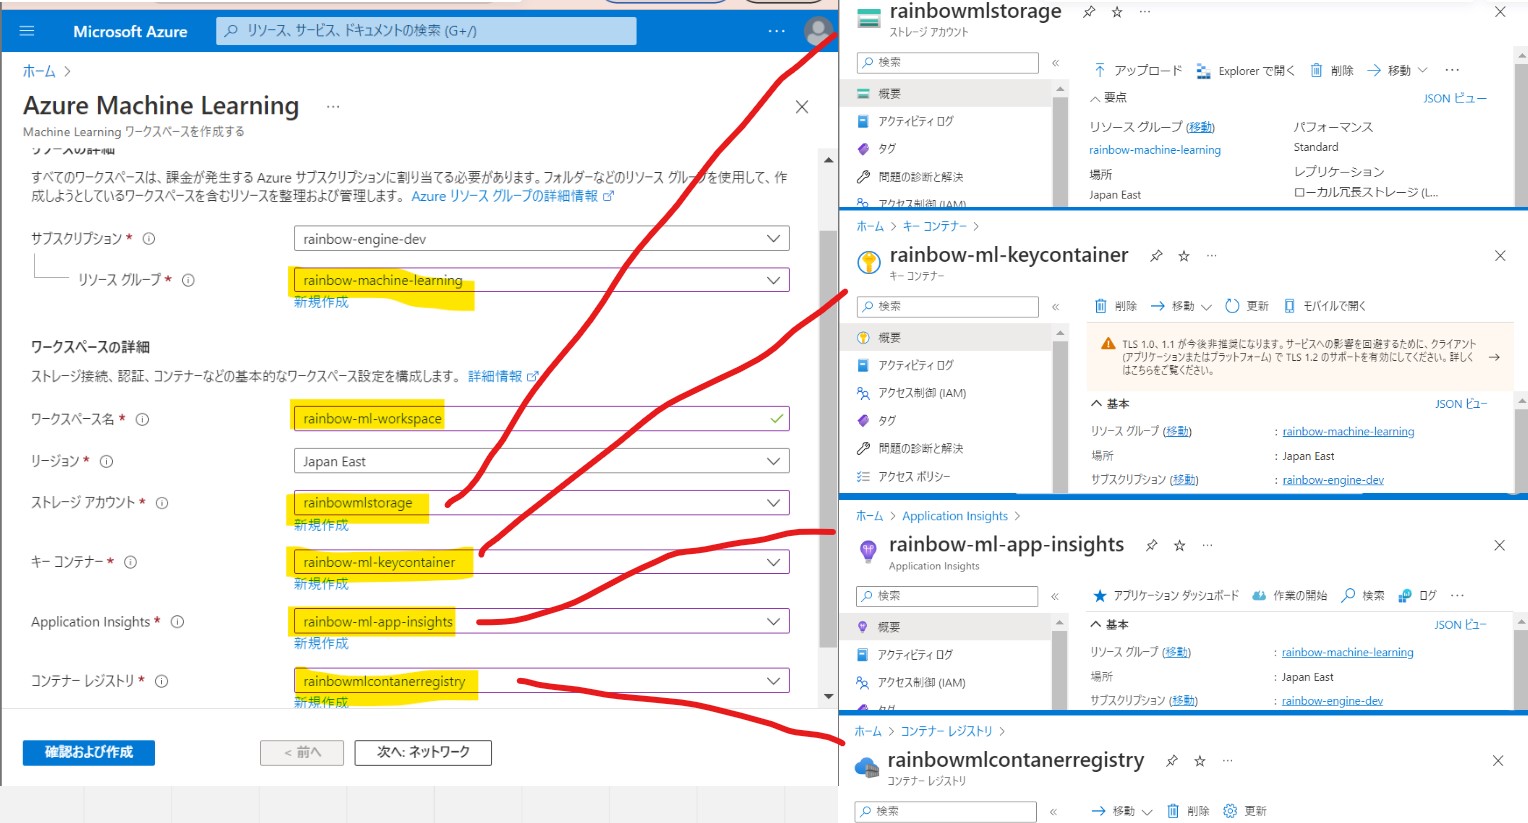
・③事前に作っておいたリソースを指定
→ストレージ、キーコンテナ、アプリケーションインサイト、コンテナレジストリ
(図111③)
↓
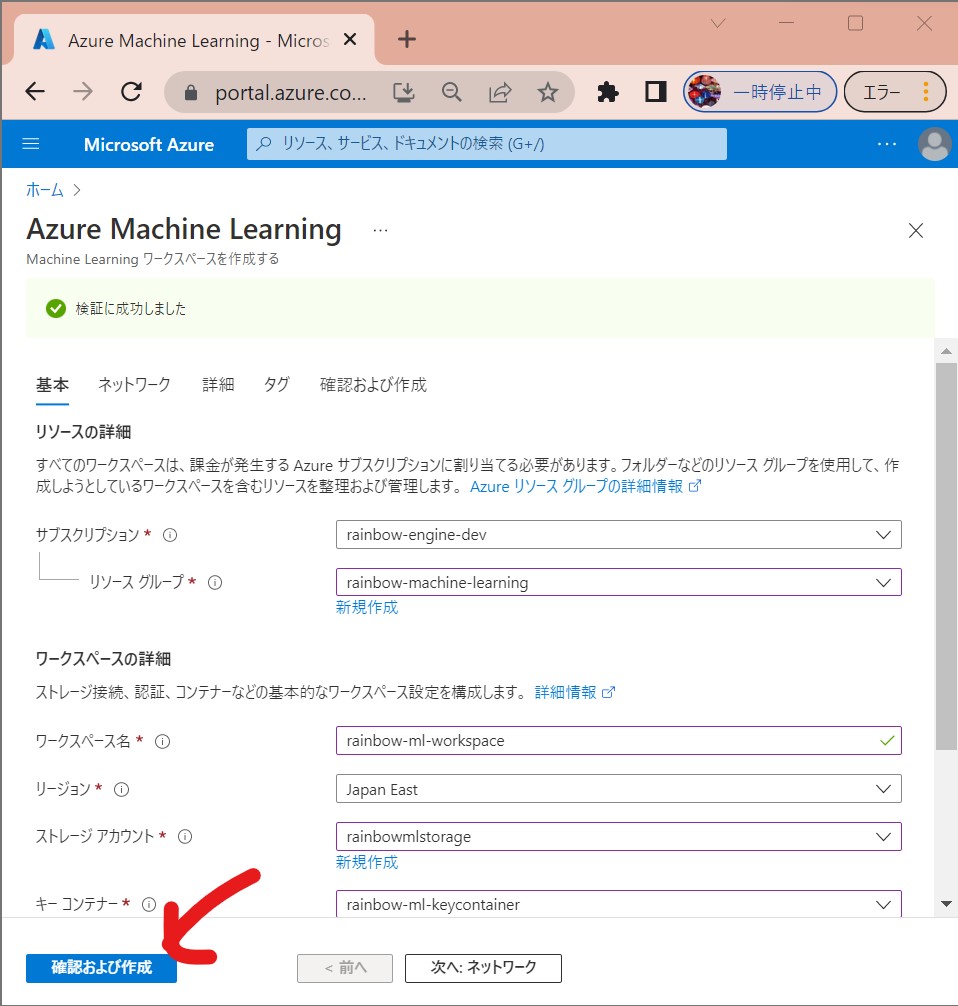
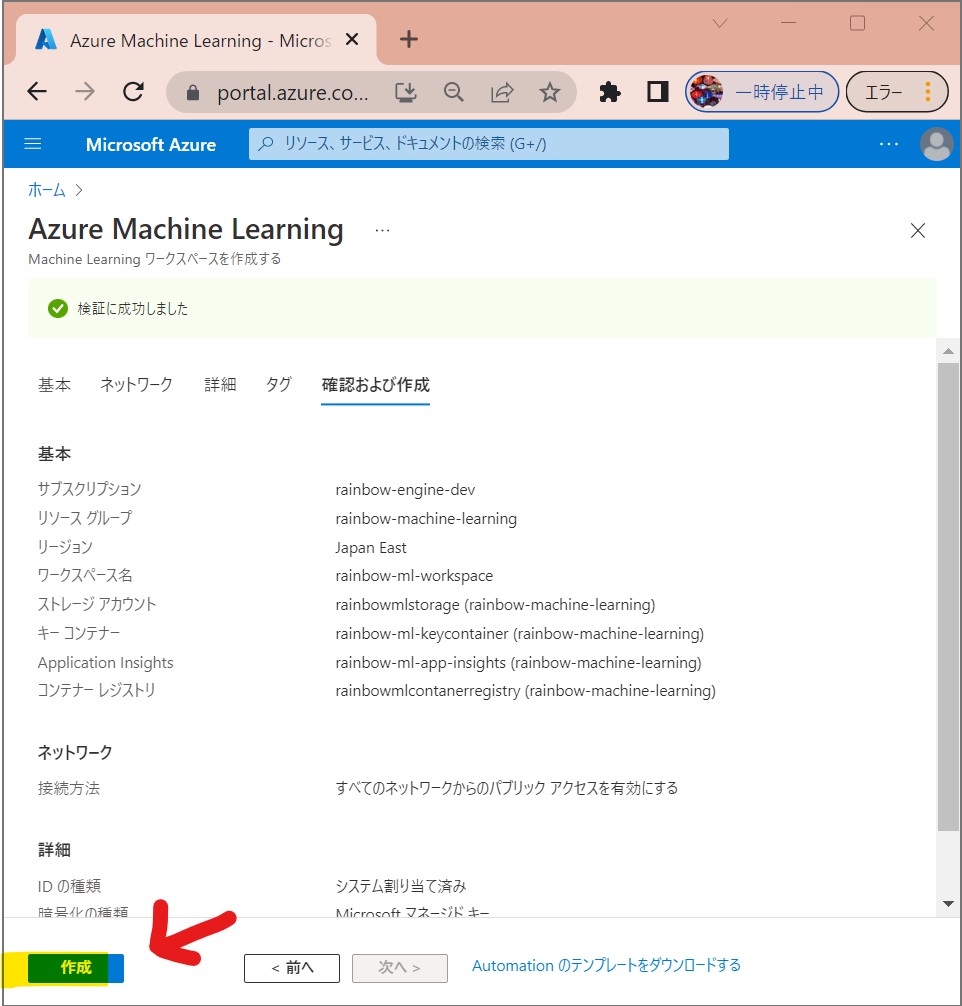
・④確認および作成
(図111④)
↓
・⑤作成
(図111⑤)
↓
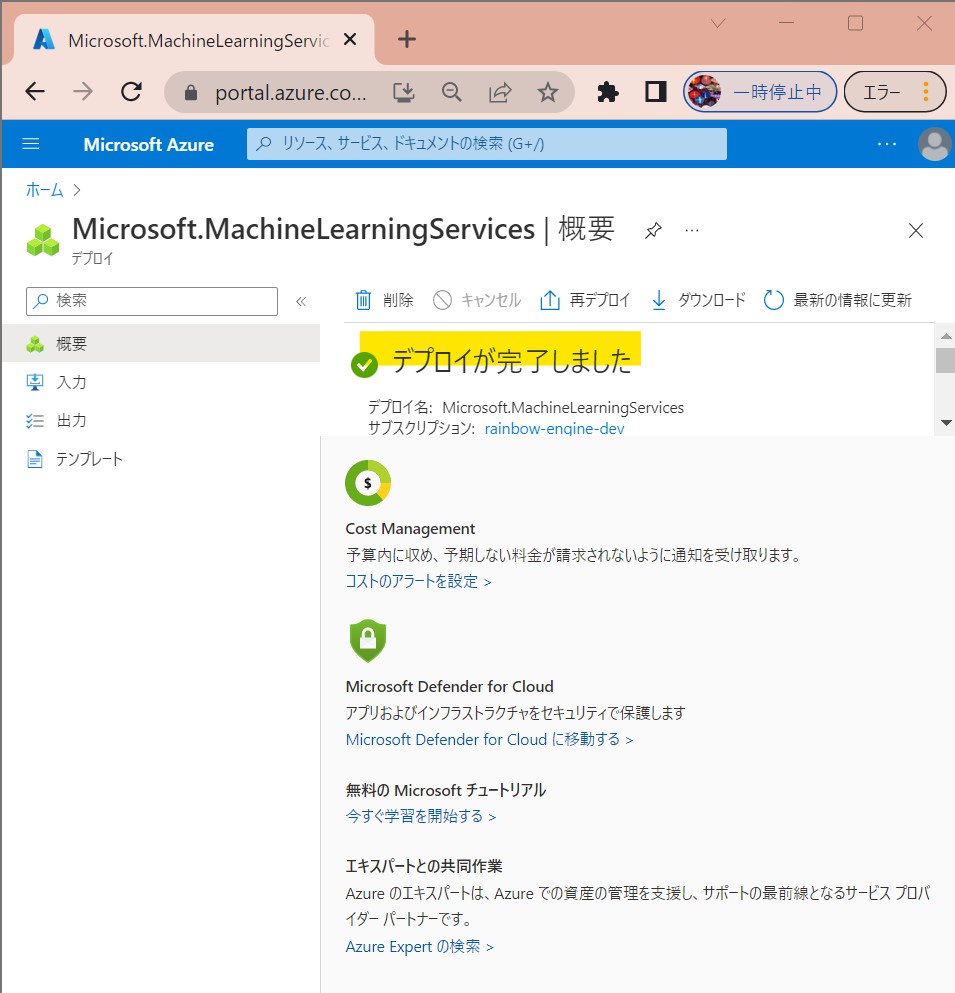
・⑥デプロイ完了
(図111⑥)
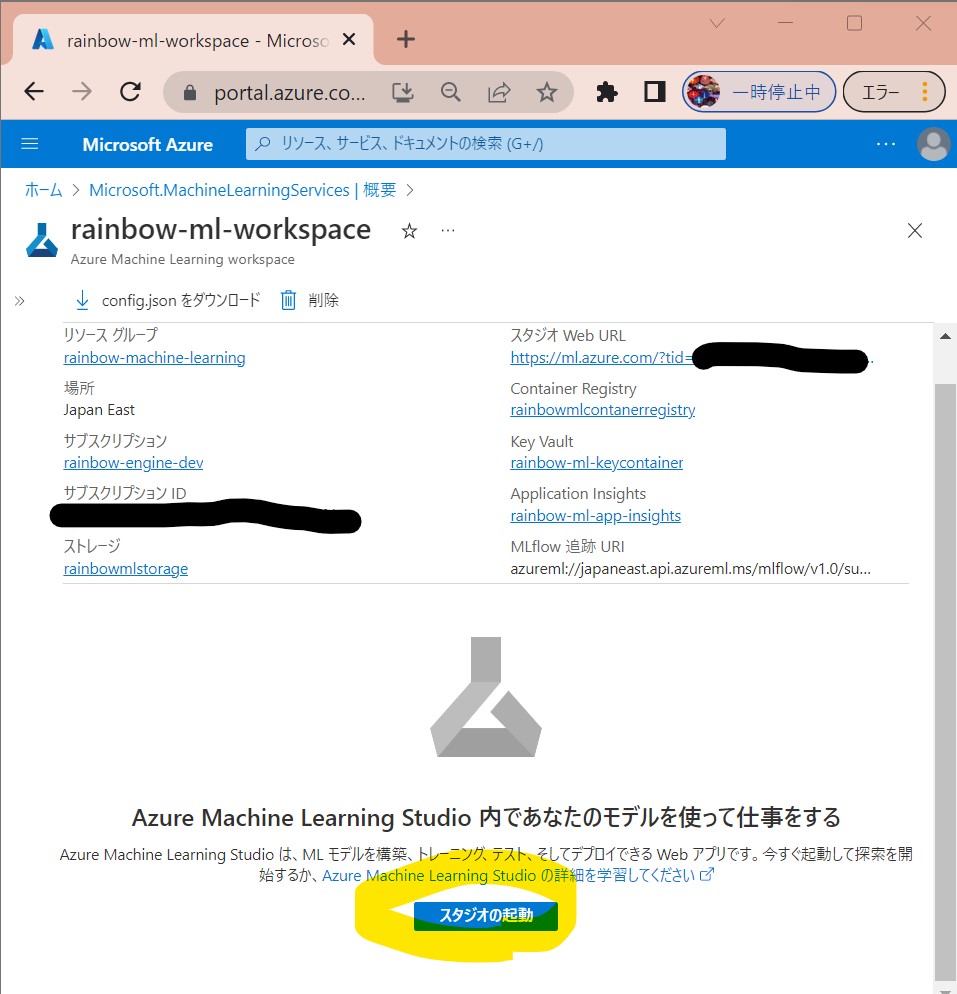
↓
・⑦スタジオ起動
(図111⑦)
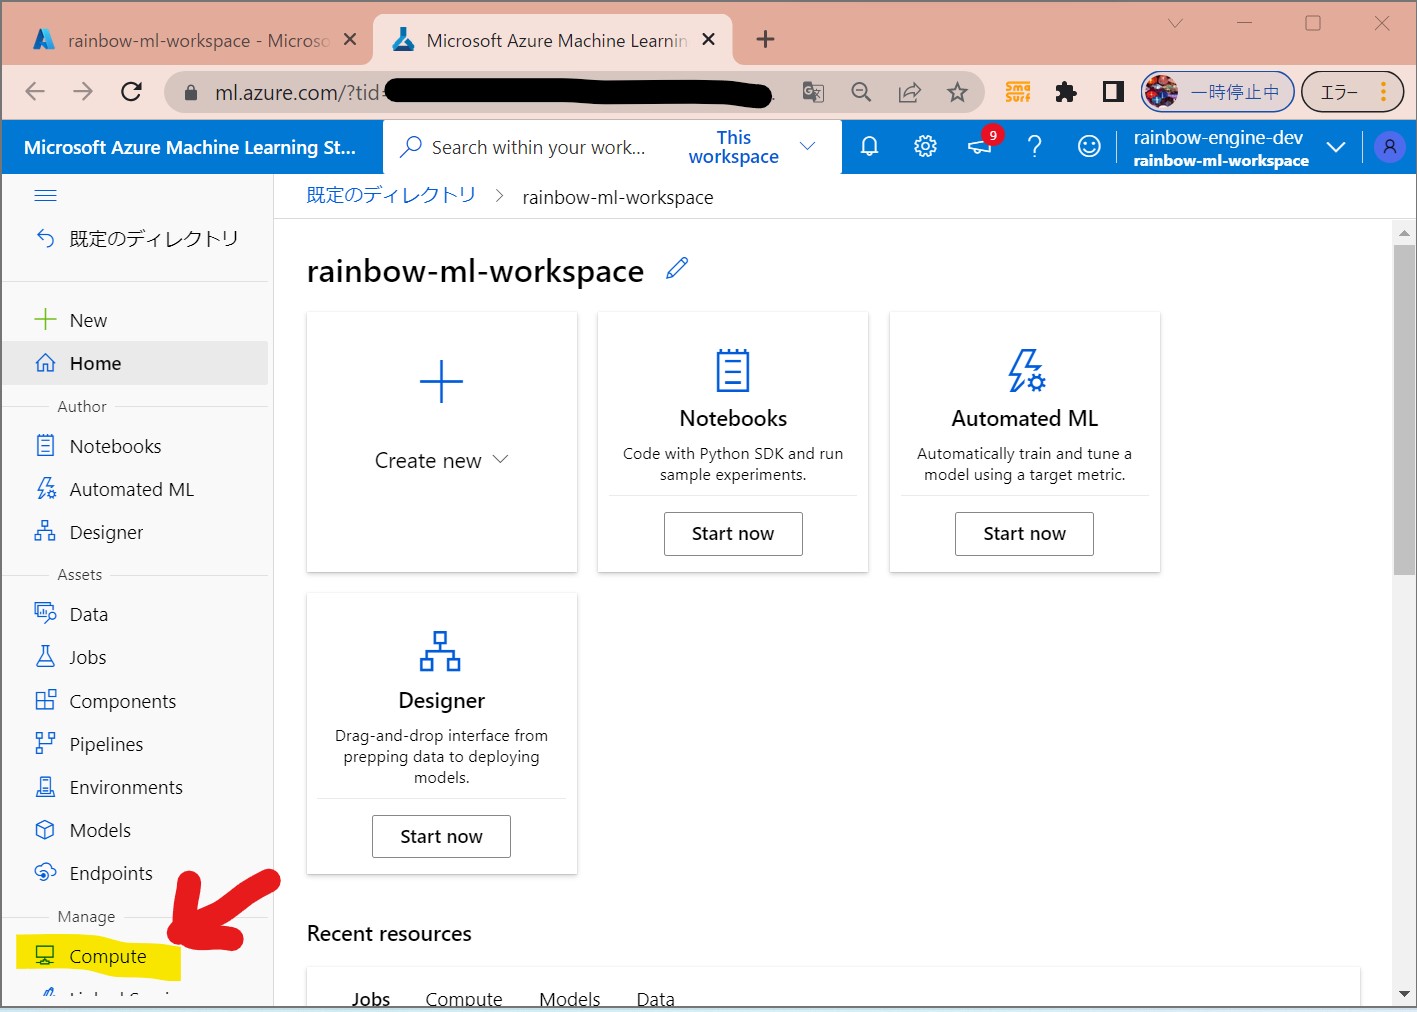
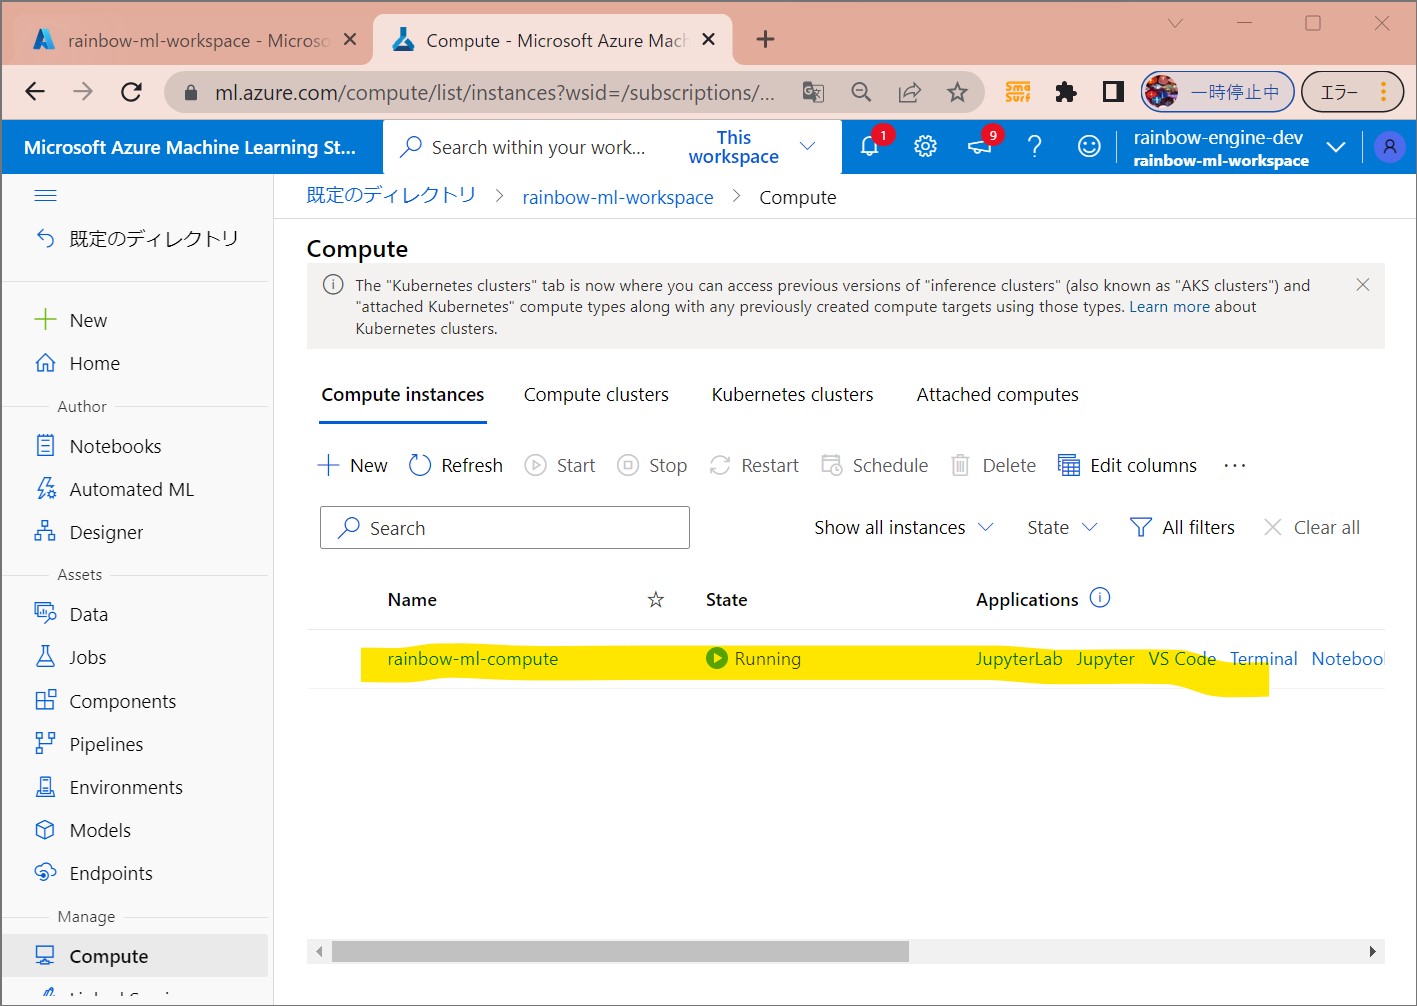
(1-2) STEP2:(事前準備)Compute Instanceの作成
・ジョブの実行には、計算処理リソースが必要
・具体的には、単一or複数のLinux/Windowsマシン/Apache Spark等のファブリック
●STEP2-1:Compute Instanceの作成
Notebooksの処理を動かすためのCPU資源。
・①Compute
(図121①)
↓
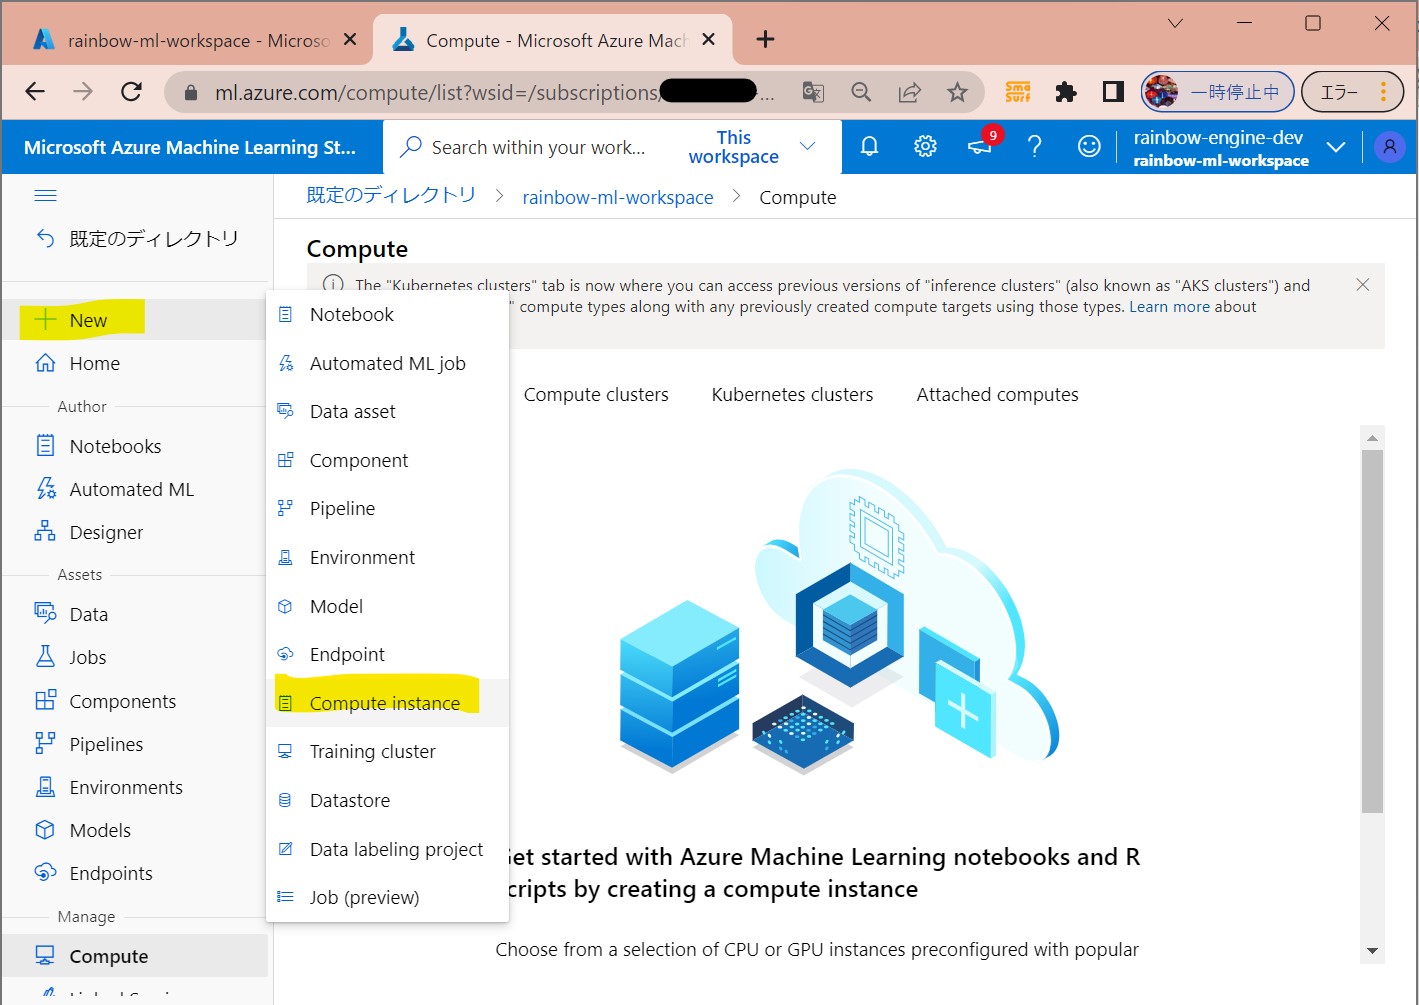
・②New→Compute instance
(図121②)
↓
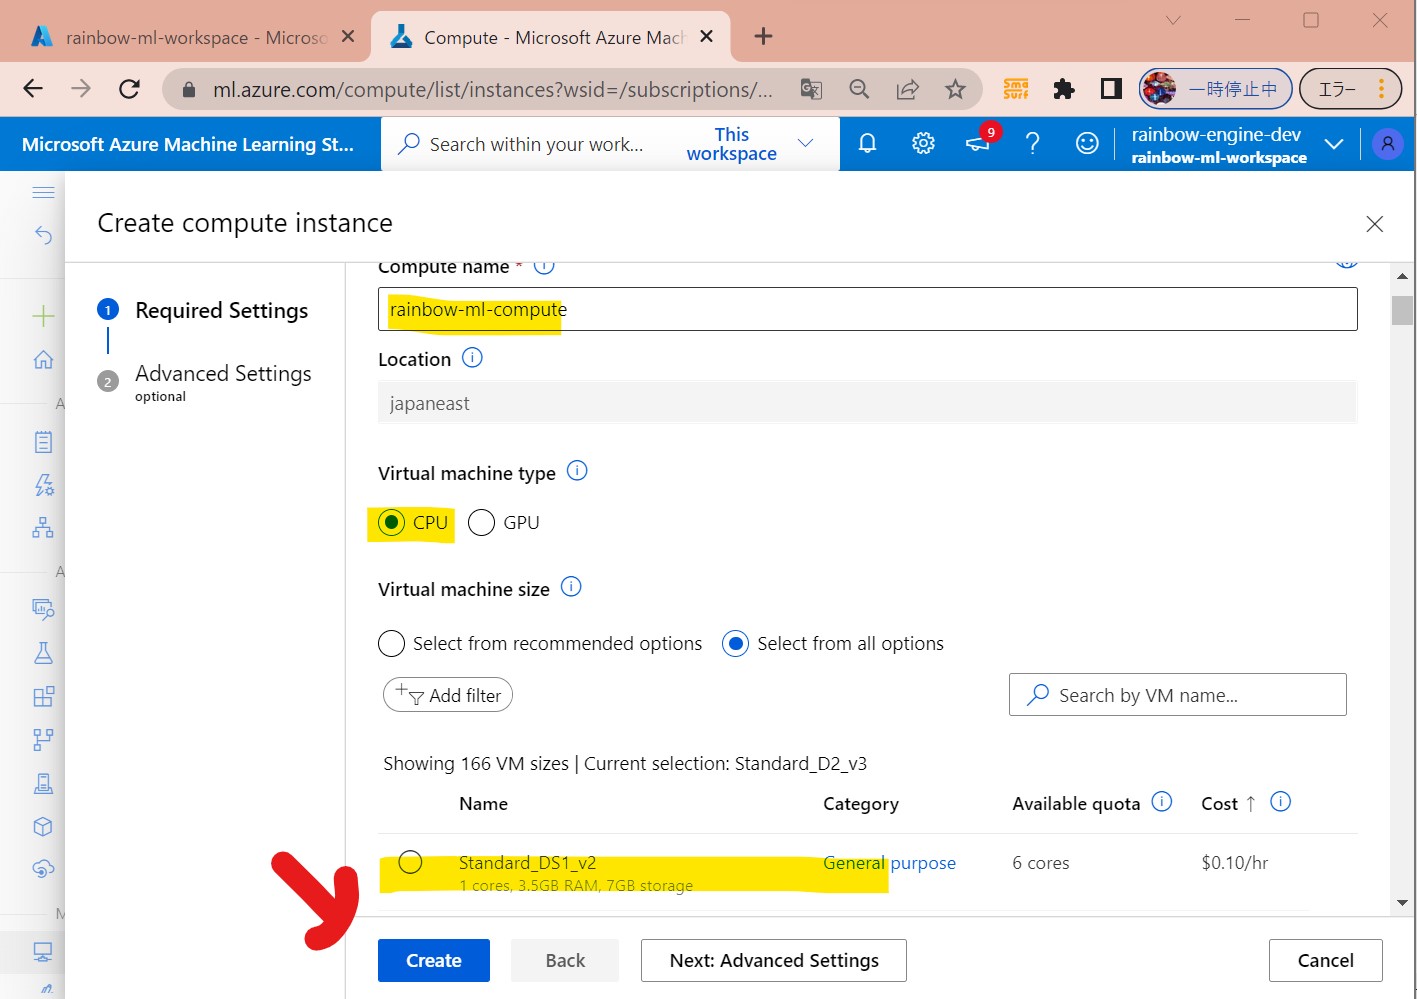
・③リソース名やCPU/GPU種別を選択して「Create」
(図121③)
↓
・④作成完了
(図121④)
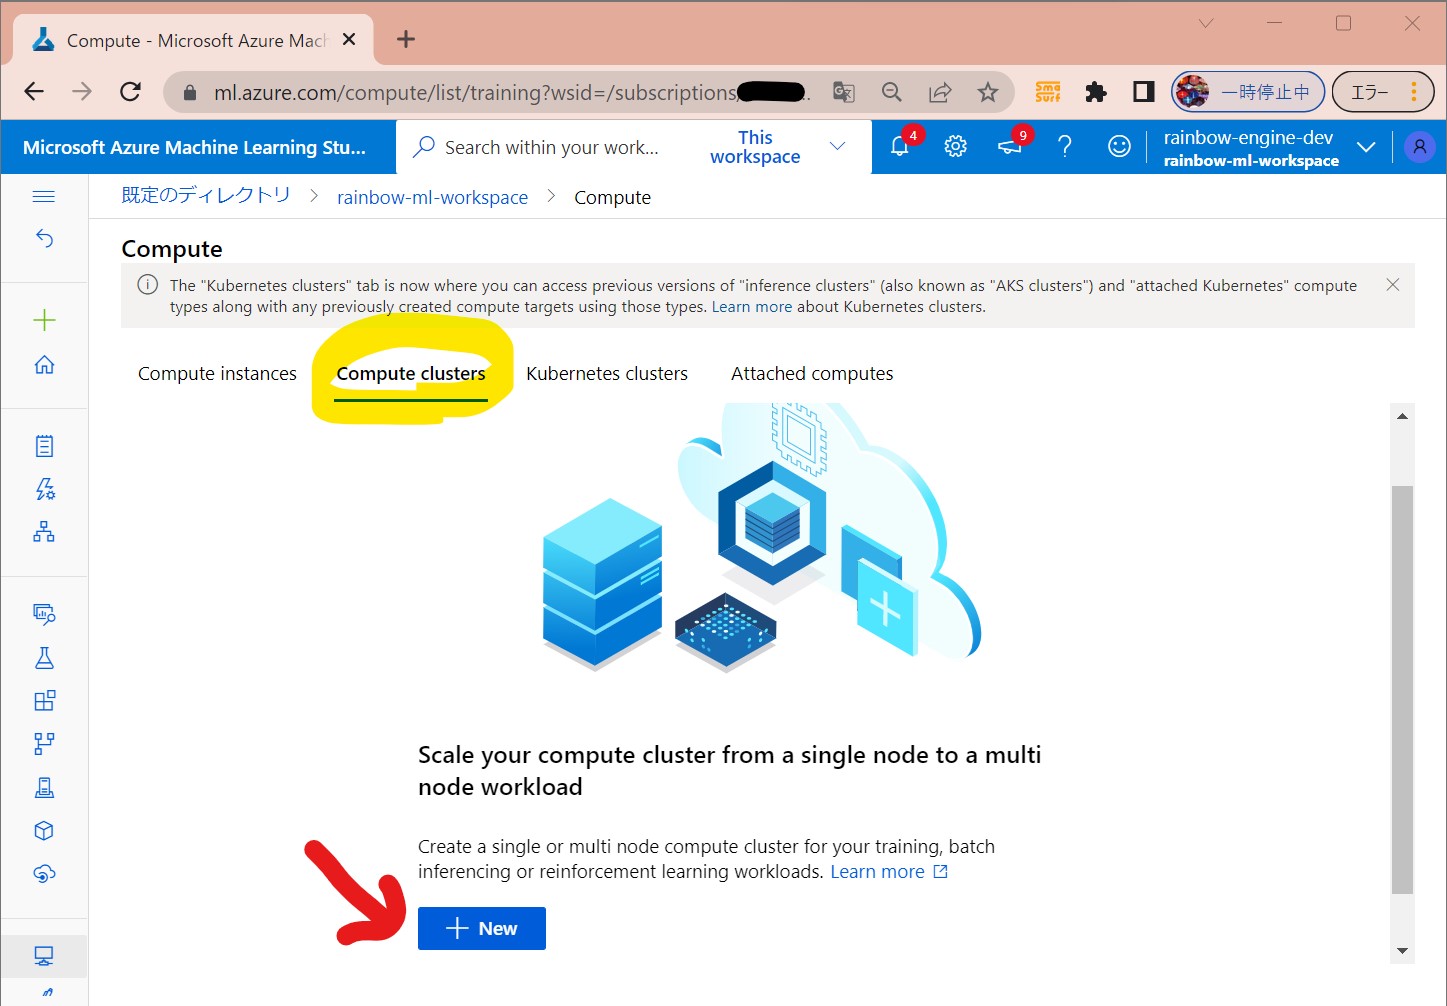
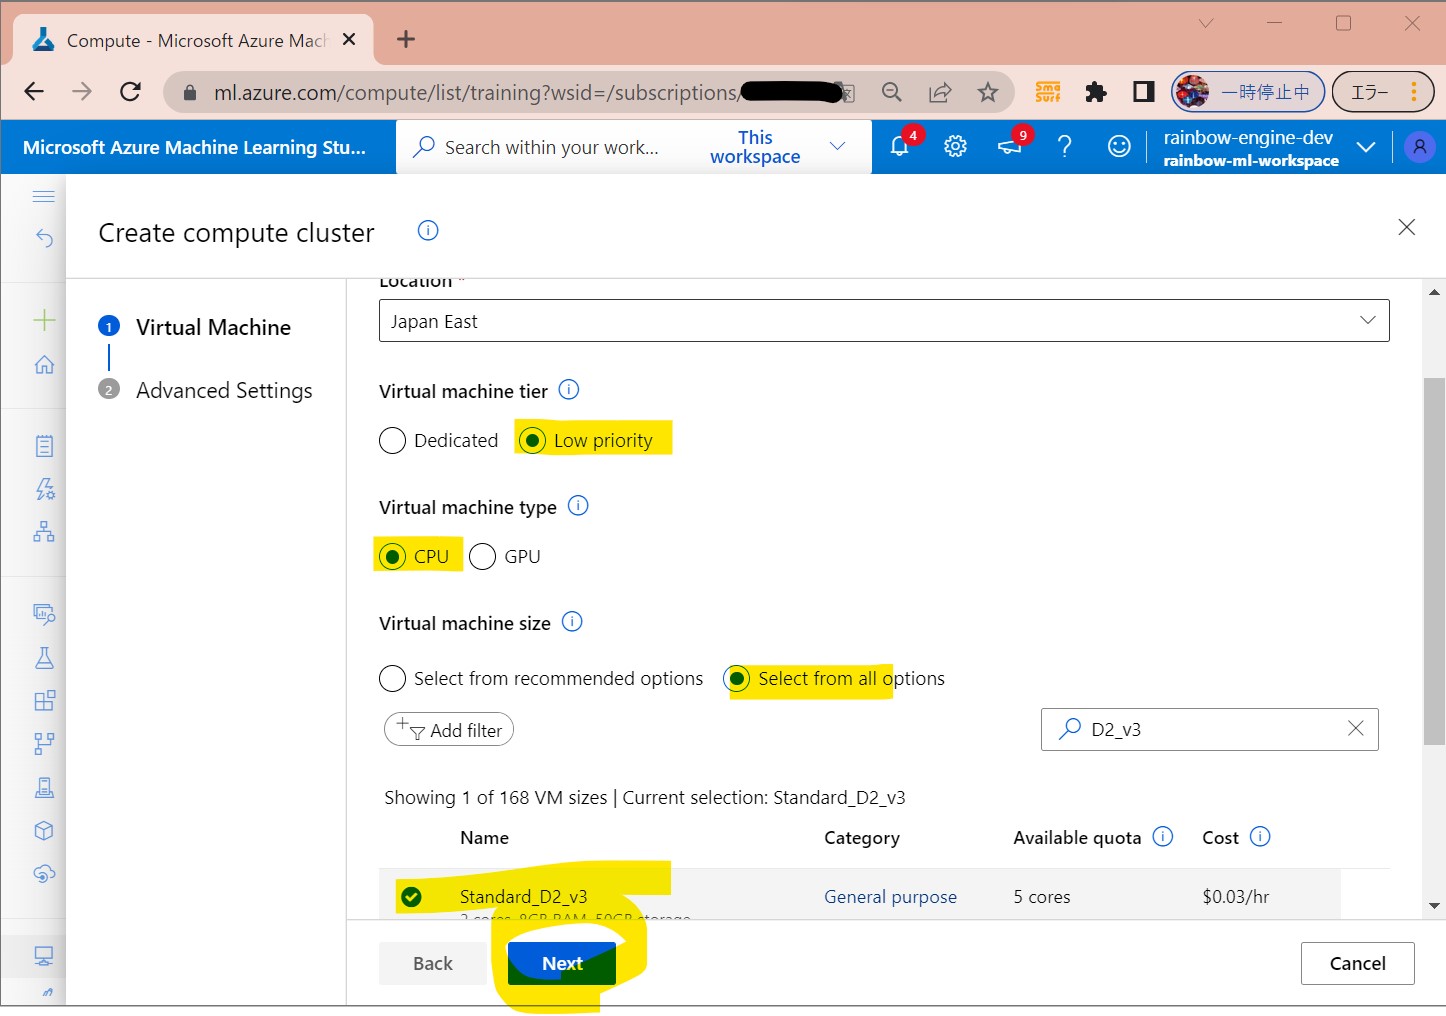
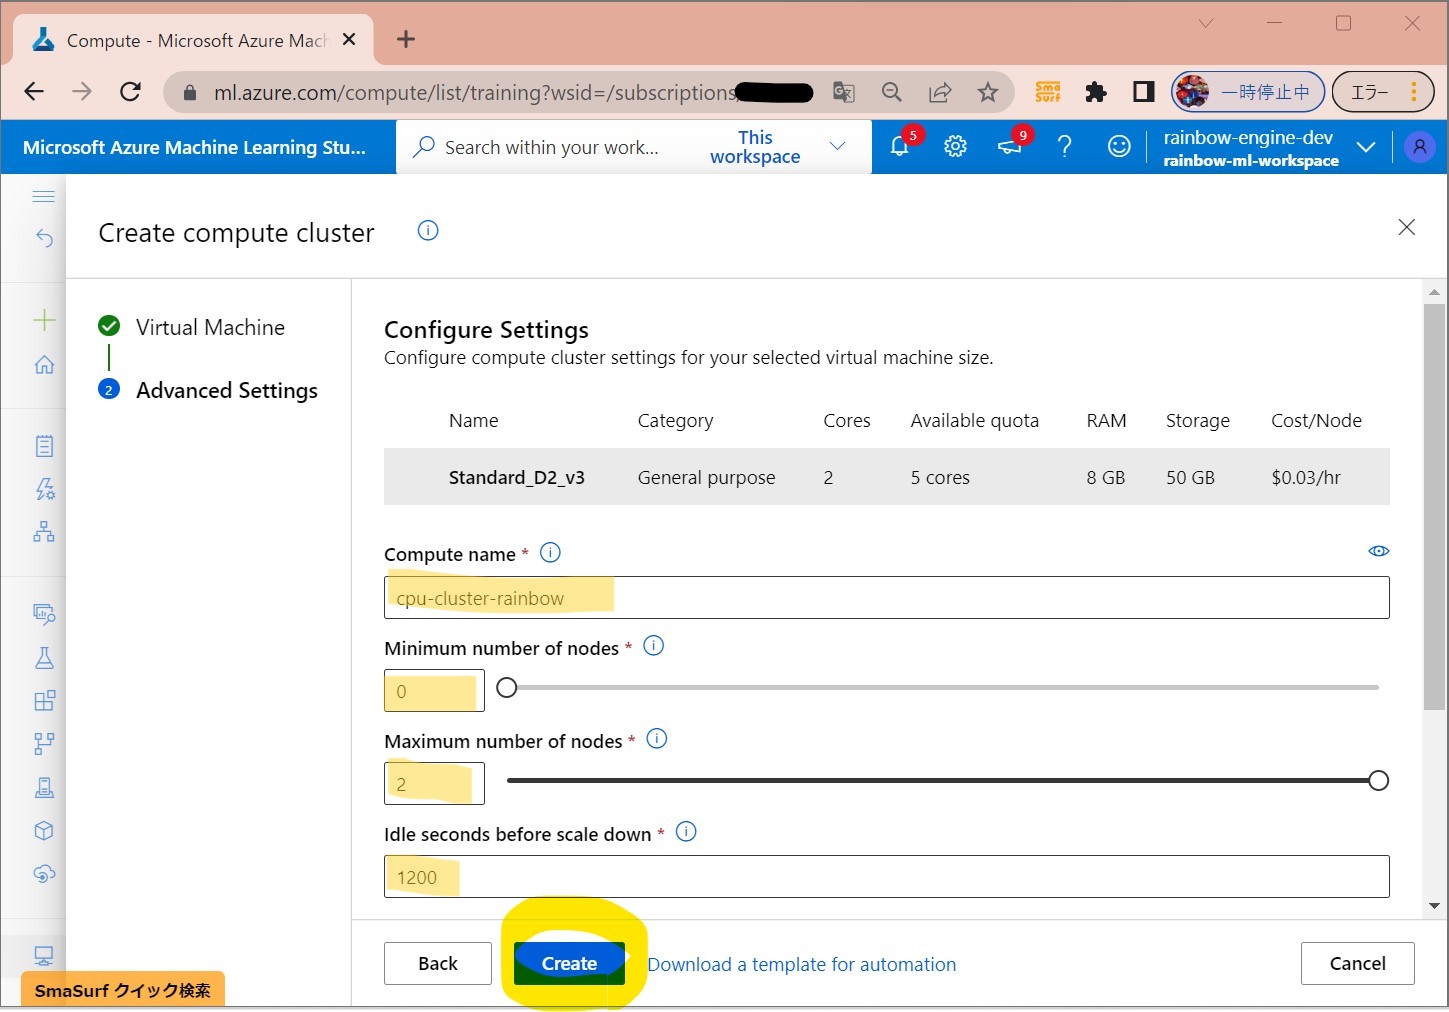
●STEP2-2:Compute Clusterの作成
学習やバッチ処理の部分は単一Instanceではなく、CPU群 or GPU群に依頼します。
・①「Compute Clusters」→「New」
(図122①)
↓
・②リソース名やCPU/GPU種別を選択して「Next」
(図122②)
↓
・③「Create」
(図122③)
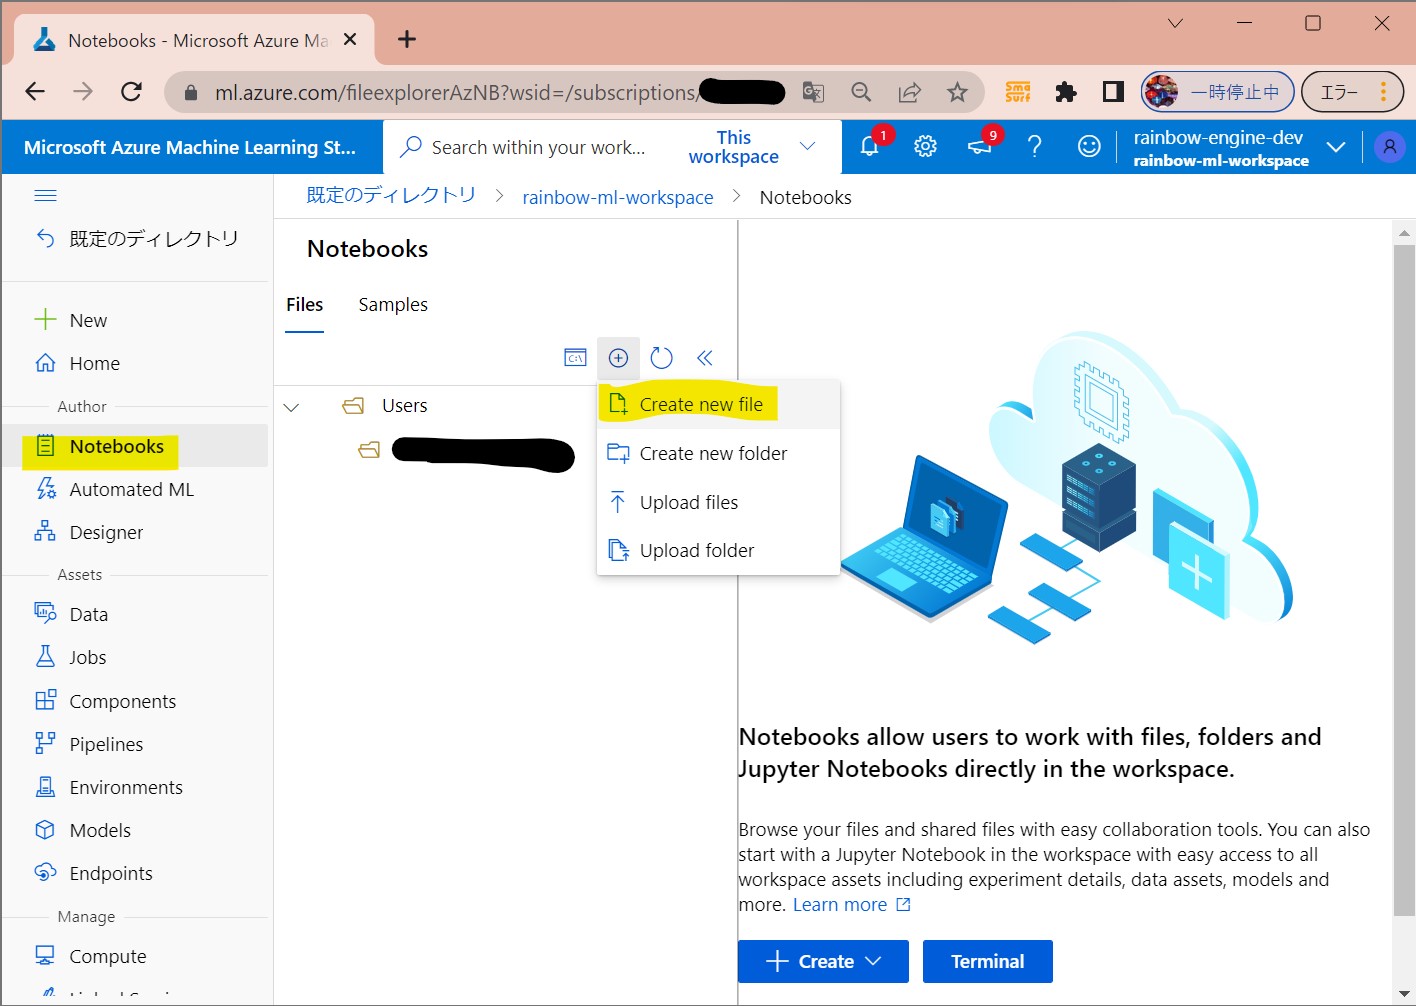
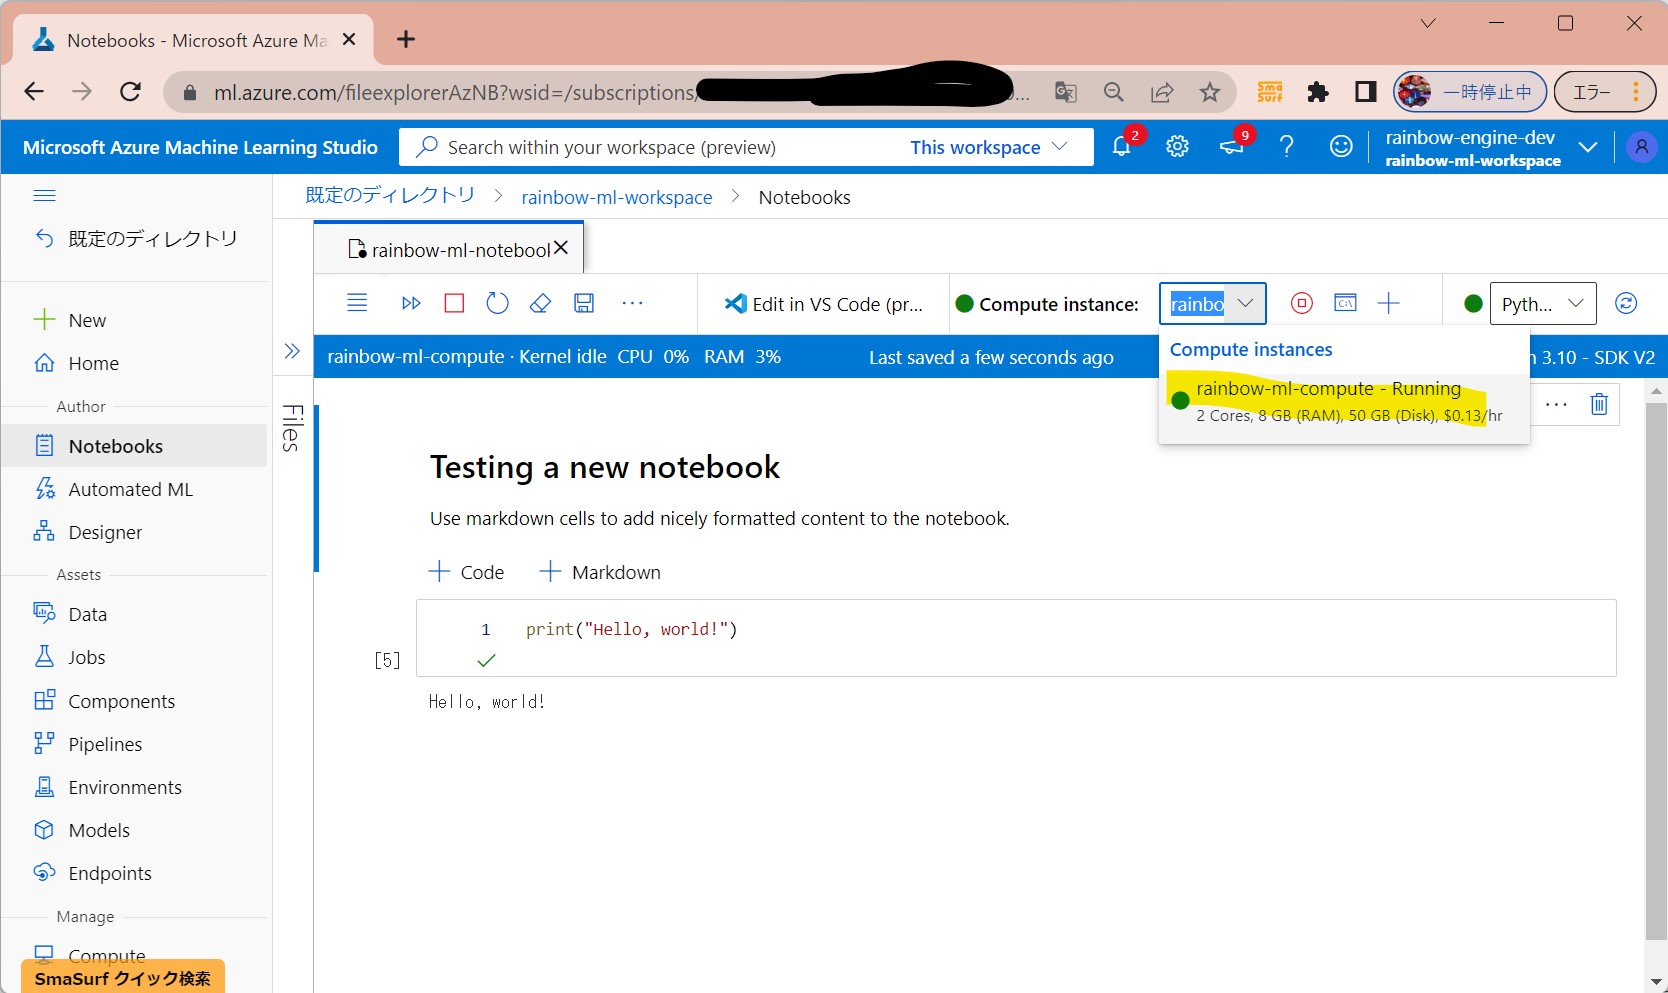
(1-3) STEP3:(事前準備)ノートブックの作成と疎通
Azure MLスタジオ上で、「notebooks」をコンピューティングインスタンスで実行する。
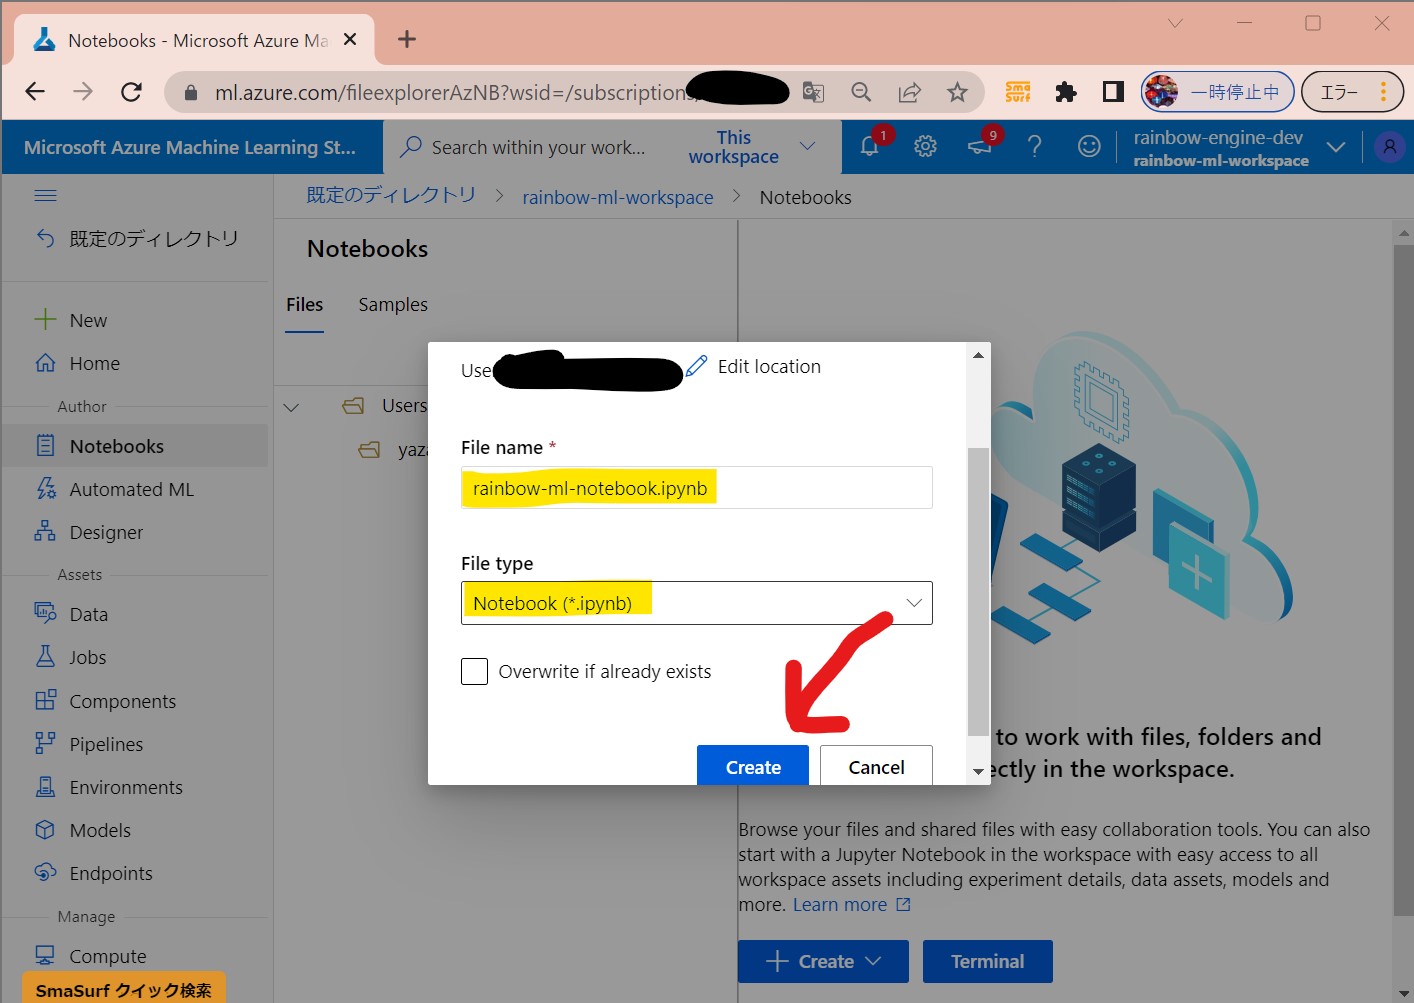
・①「Notebook」→「Create New File」
(図131①)
↓
・②「Create」
(図131②)
↓
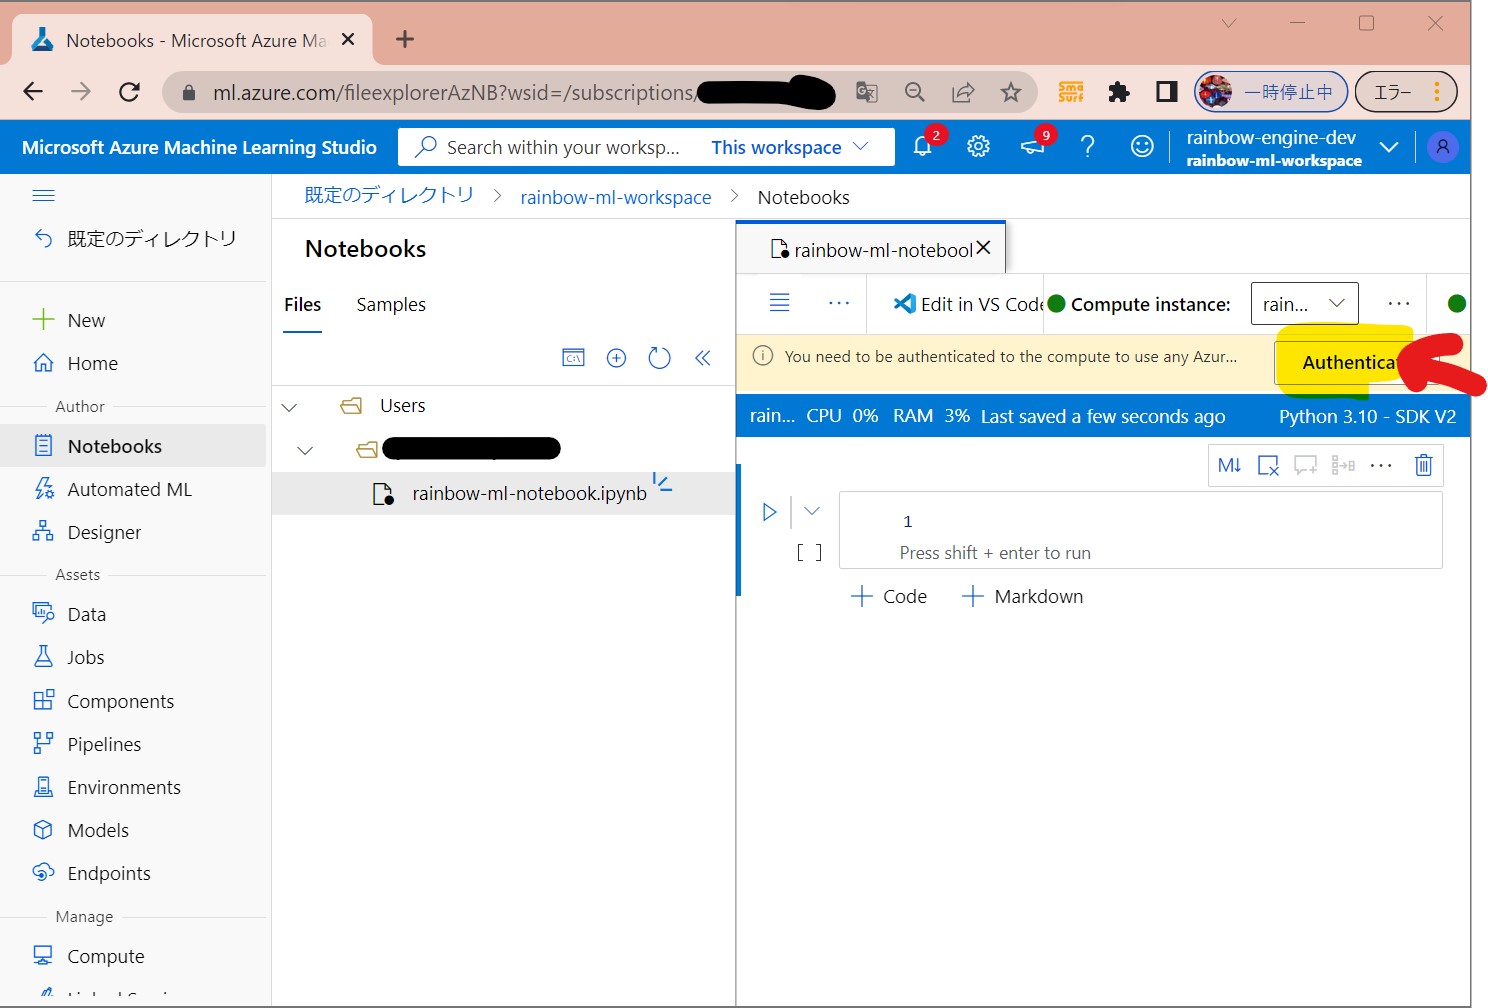
・③認証
(図131③)
↓
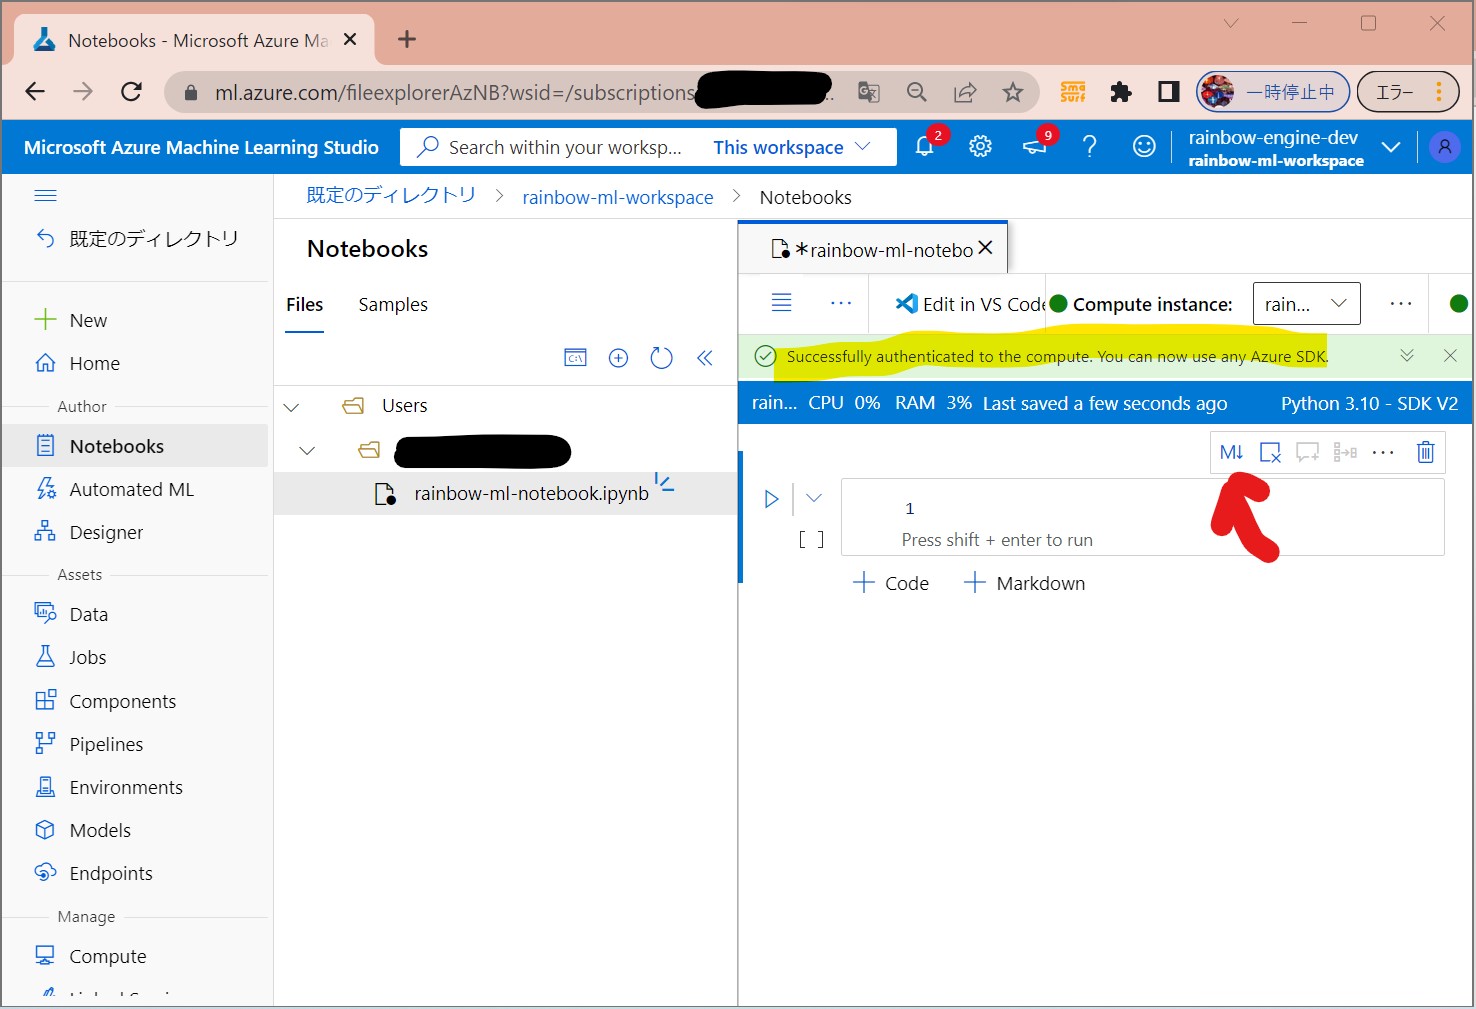
・④認証完了
(図131④)
↓
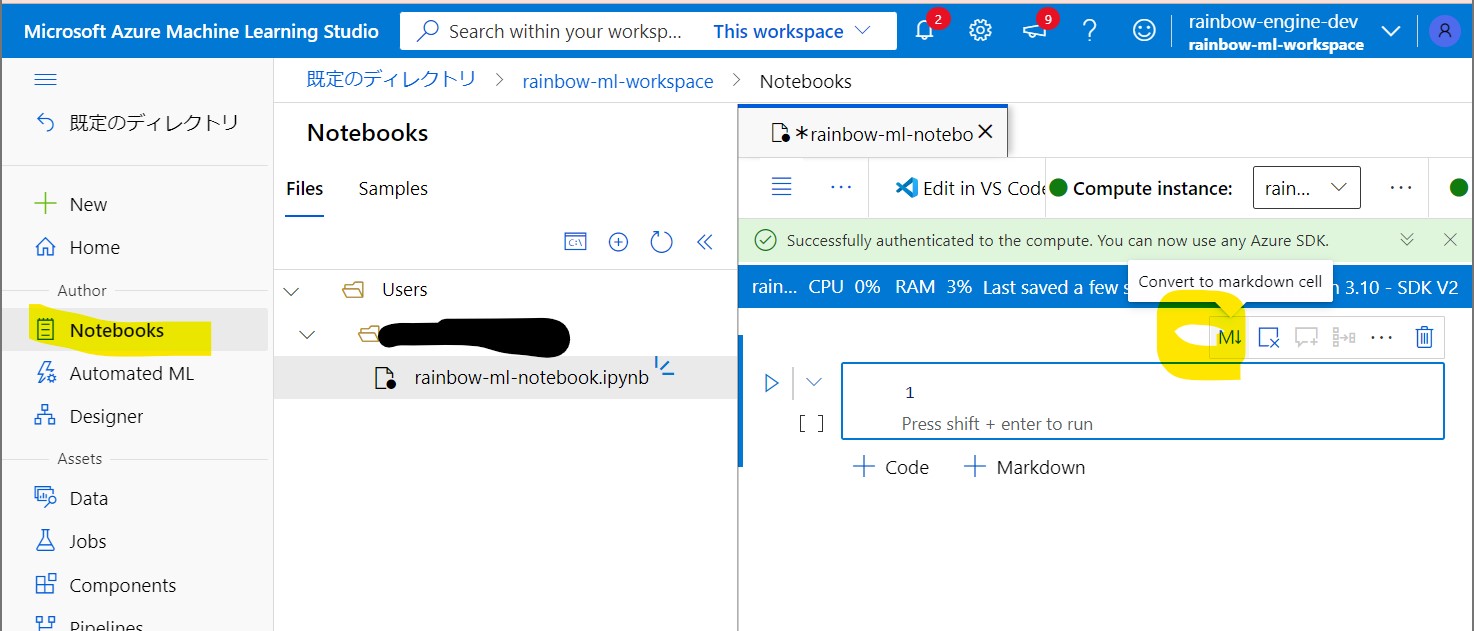
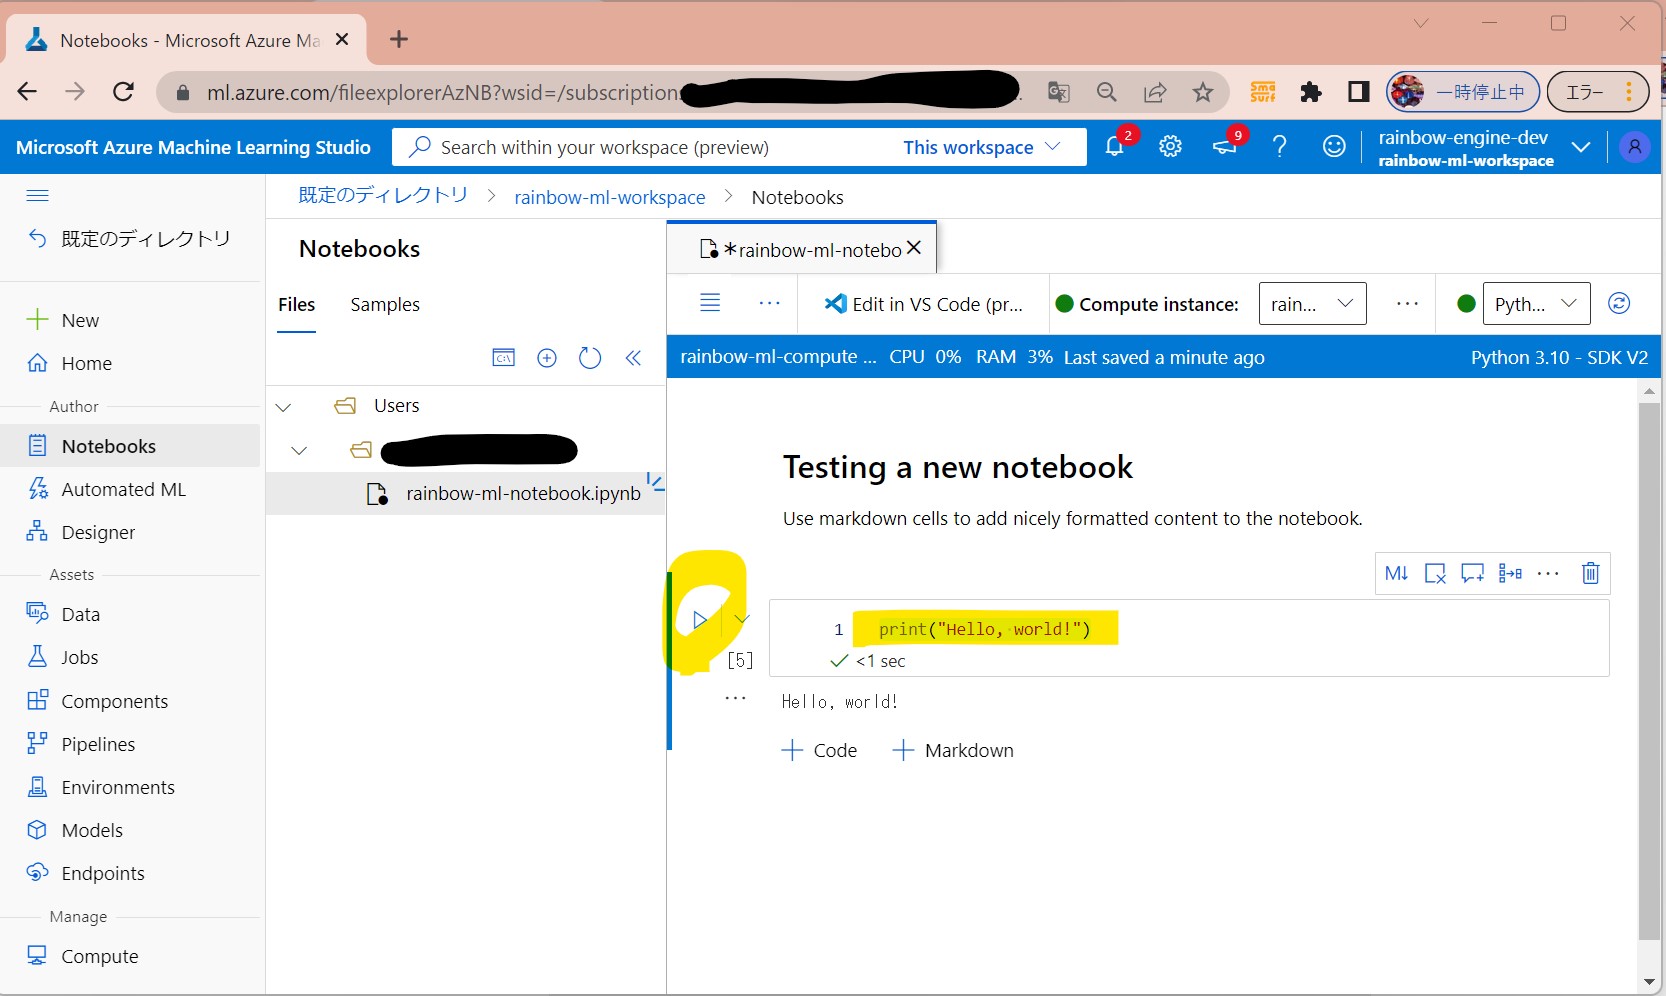
・⑤マークダウンセルに変更
→「Convert to Markdown cell」押下
(図131⑤)
↓
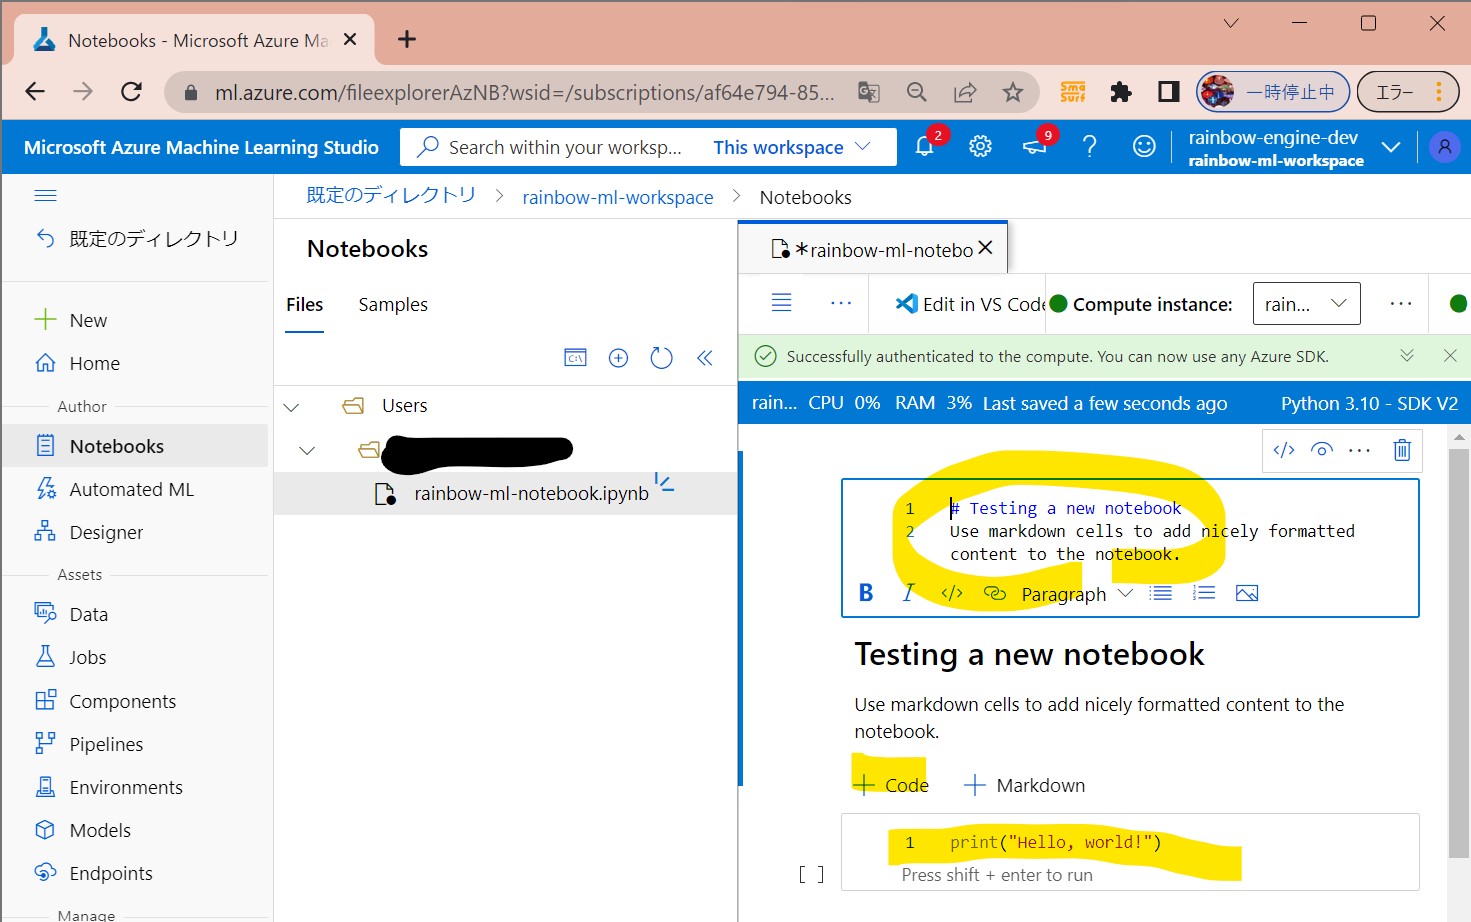
・⑥入力
(A)Markdown=コメントや説明用
# Testing a new notebook
Use markdown cells to add nicely formatted content to the notebook.
(B)Code=処理記述用
print("Hello, world!")
(図131⑥)
↓
・⑦「Compute instanse」がご自身で作成したものになっているか?、「kernel」が「Python 3.10 – SDK v2」になっているか?を確認する。
(図131⑧)
↓
・⑧実行
(図131⑦)
(1-4) STEP4:(処理記述)ワークスペースへの接続
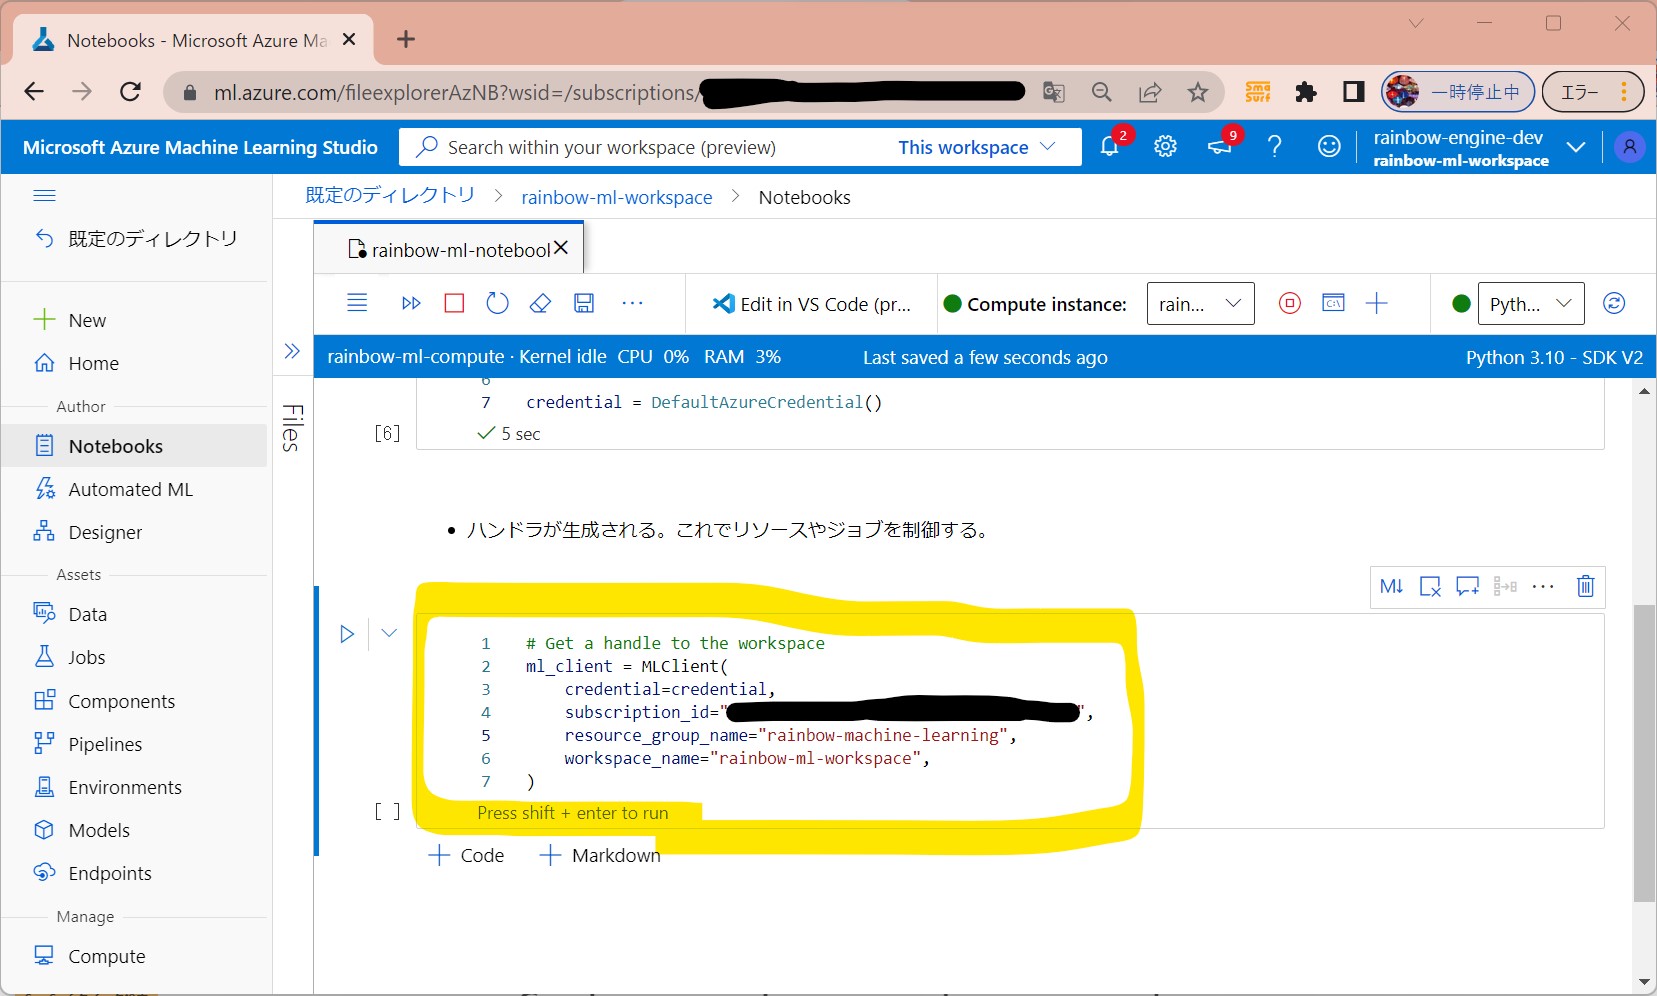
・まず始めに、Azure MLのワークスペースに「接続」をします。
・ワークスペースはAzure MLの最上位のリソースである。
・DefaultAzureCredential はAzure SDKの認証でよく使用される。
・①認証情報のセット
(図132①)
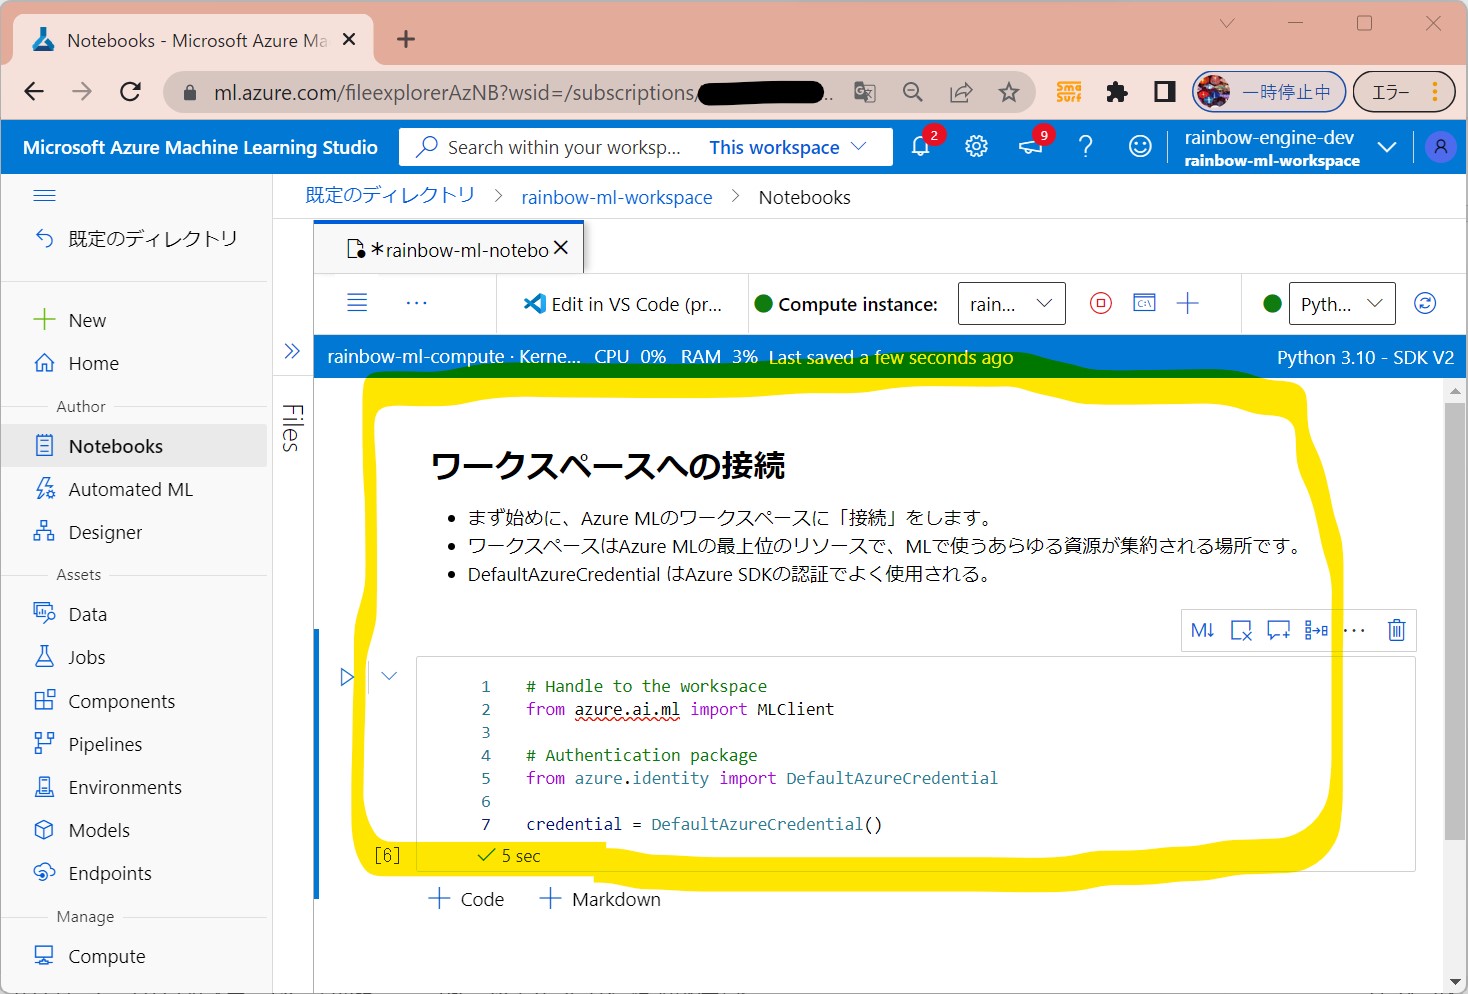
(セル値)
# Handle to the workspace
from azure.ai.ml import MLClient
# Authentication package
from azure.identity import DefaultAzureCredential
credential = DefaultAzureCredential()
↓
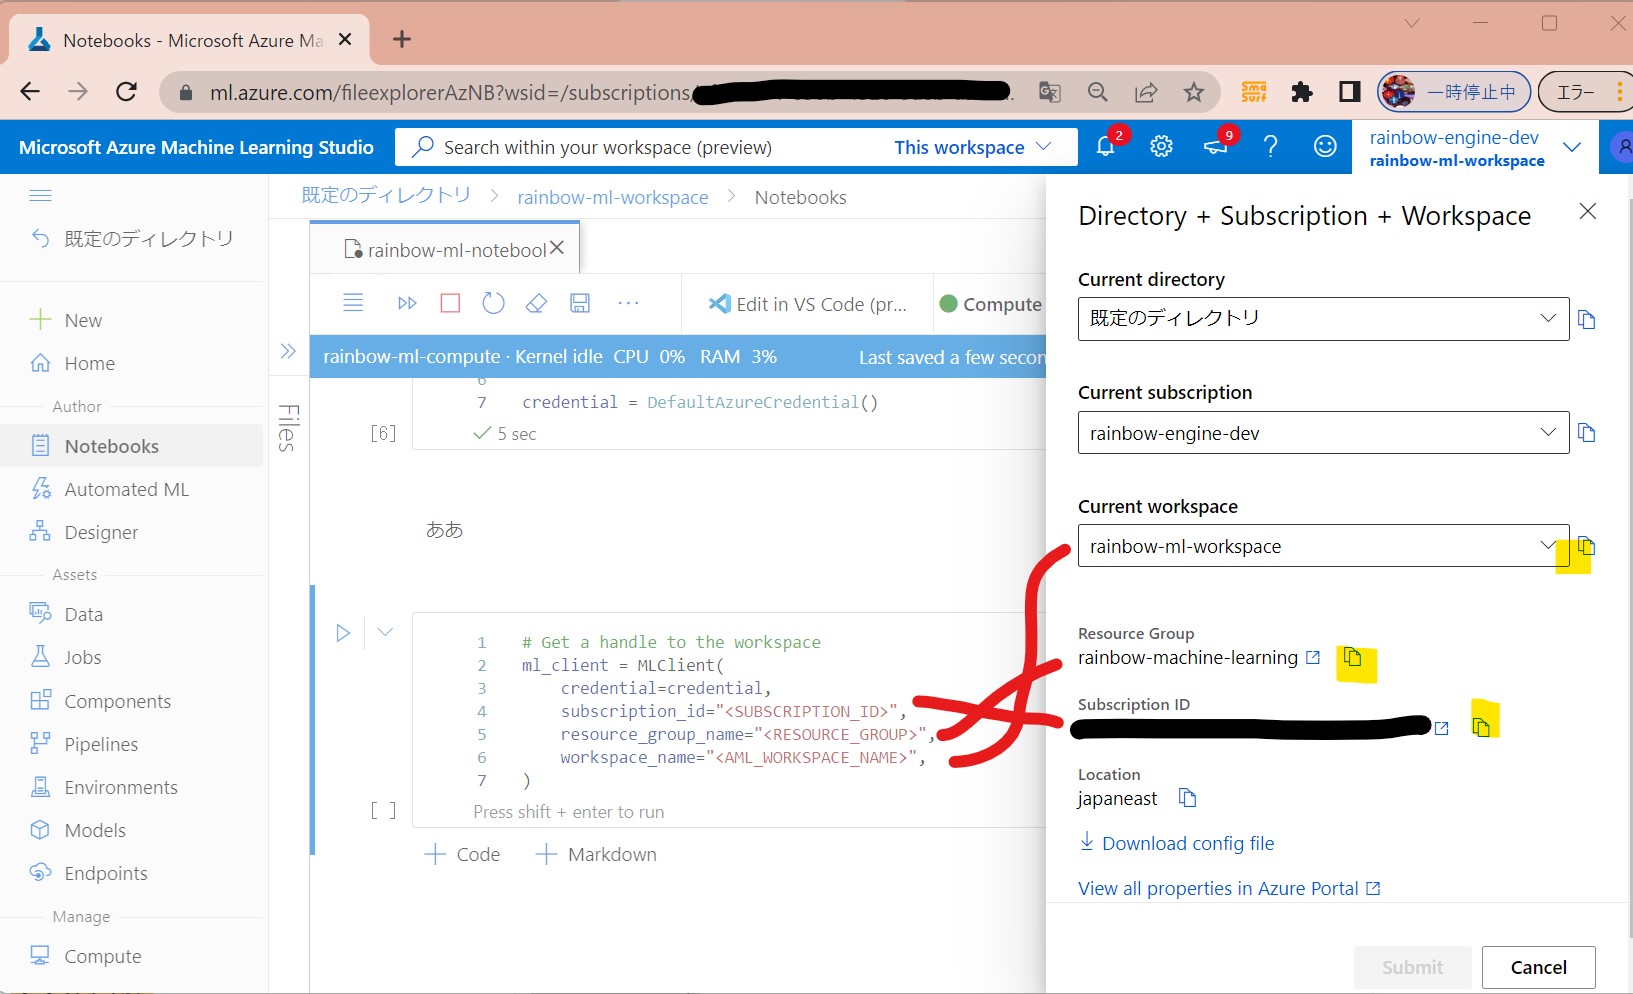
・②認証
→ハンドラが生成される。これでリソースやジョブを制御する。
(セル値)
# Get a handle to the workspace
ml_client = MLClient(
    credential=credential,
    subscription_id="",
    resource_group_name="",
    workspace_name="",
)
(図132②)
↓
(図132③)
(1-5) STEP5:(処理記述)Computeリソースの作成
・事前に作成した「Compute Instance」を使用する。
(セル値)
from azure.ai.ml.entities import AmlCompute
# Compute Clusterの名前(ご自身で指定)
cpu_compute_target = "cpu-cluster-rainbow"
try:
    # 上記名前のリソースが既にあるか?をチェック。
    # あれば再利用する。
    cpu_cluster = ml_client.compute.get(cpu_compute_target)
    print(
        f"You already have a cluster named {cpu_compute_target}, we'll reuse it as is."
    )
except Exception:
    print("Creating a new cpu compute target...")
    # ない場合、下記パラメータでAzure ML computeオブジェクトを作成
    cpu_cluster = AmlCompute(
        name=cpu_compute_target,
        # Azure ML ComputeはオンデマンドのVMサービス
        type="amlcompute",
        # VM Family
        size="STANDARD_DS3_V2",
        # 最小起動ノード数(ジョブ無い時)
        min_instances=0,
        # クラスターのノード数
        max_instances=4,
        # ジョブが停止後、どの程度ノードが起動し続けるか?
        idle_time_before_scale_down=180,
        # DedicatedかLowPriority。後者は安いがジョブ停止のリスクあり。
        tier="Dedicated",
    )
    # オブジェクトをMLClientの「begin_create_or_update」メソッドに渡す
    cpu_cluster = ml_client.compute.begin_create_or_update(cpu_cluster)
print(
    f"AMLCompute with name {cpu_cluster.name} is created, the compute size is {cpu_cluster.size}"
)
(図133①)

(1-6) STEP6:(処理記述)ジョブのEnvironmentを作成
・ジョブの実行環境を作成します。
・ジョブ環境は、学習時に必要となる「ソフトウェアランタイム」や「ライブラリ」が揃っている。
・Pythonの環境(venvなど)と似ている
・例では、yamlファイルからconda環境を作成します。
●STEP6-1:dependenciesという名前のディレクトリを作成
(セル値)
import os
dependencies_dir = "./dependencies"
os.makedirs(dependencies_dir, exist_ok=True)
●STEP6-2:ディレクトリに、conda.ymlファイルを作成する。
その中に、ジョブ実行で必要となるライブラリを記述したconda.ymlを作成。
(セル値)
%%writefile {dependencies_dir}/conda.yml
name: model-env
channels:
  - conda-forge
dependencies:
  - python=3.8
  - numpy=1.21.2
  - pip=21.2.4
  - scikit-learn=0.24.2
  - scipy=1.7.1
  - pandas>=1.1,<1.2
  - pip:
    - inference-schema[numpy-support]==1.3.0
    - xlrd==2.0.1
    - mlflow== 1.26.1
    - azureml-mlflow==1.42.0
    - psutil>=5.8,<5 .9
    - tqdm>=4.59,<4 .60
    - ipykernel~=6.0
    - matplotlib
●STEP6-3:yamlファイルを参照して環境を生成
環境(Environment)は実行時にDockerコンテナにパッケージ化されます。
(セル値)
from azure.ai.ml.entities import Environment
custom_env_name = "aml-scikit-learn"
pipeline_job_env = Environment(
    name=custom_env_name,
    description="Custom environment for Credit Card Defaults pipeline",
    tags={"scikit-learn": "0.24.2"},
    conda_file=os.path.join(dependencies_dir, "conda.yml"),
    image="mcr.microsoft.com/azureml/openmpi3.1.2-ubuntu18.04:latest",
)
pipeline_job_env = ml_client.environments.create_or_update(pipeline_job_env)

print(
    f"Environment with name {pipeline_job_env.name} is registered to workspace, the environment version is {pipeline_job_env.version}"
)
(参考)
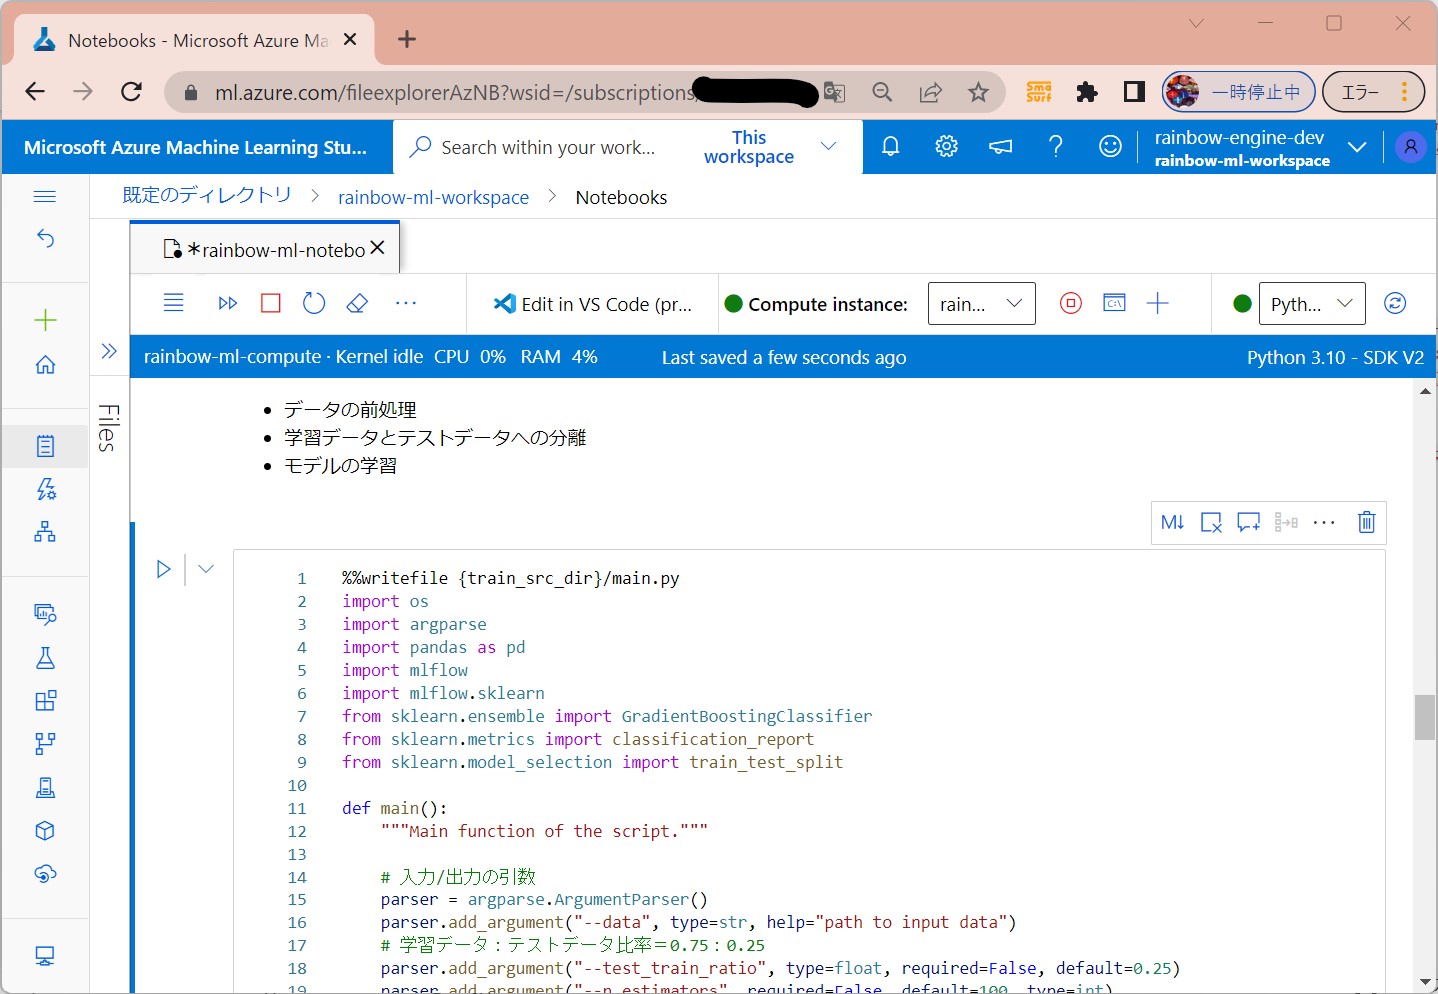
(1-7) STEP7:(処理記述)学習スクリプトの作成
学習に使用するスクリプトを「コマンドジョブ」と呼ぶ。
学習の過程では、データの準備/学習/学習済みモデルの登録を行います。
ジョブの実行はCLI経由、Python SDK経由、ML StudioのGUI経由など様々な方法がある。
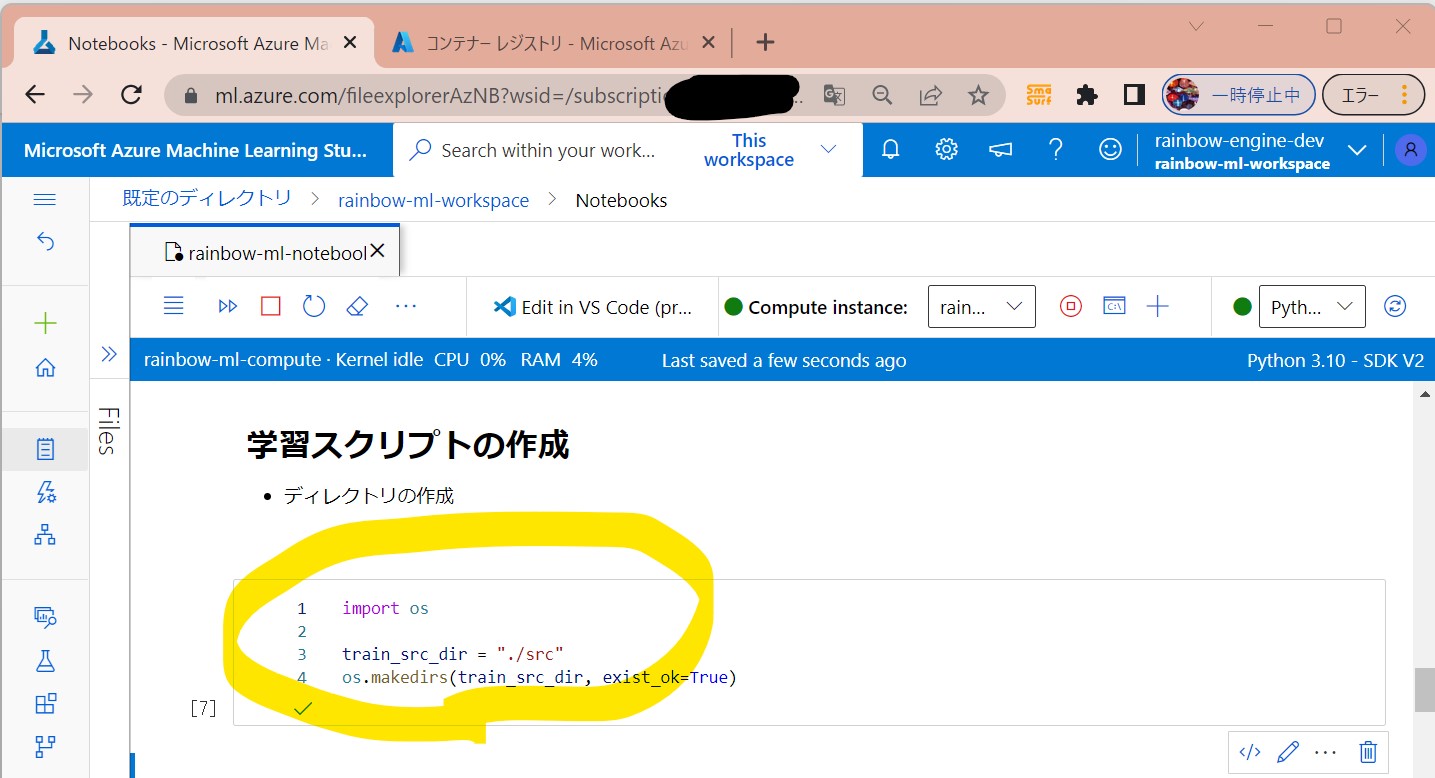
●STEP7-1:ディレクトリの作成
(セル値)
import os
train_src_dir = "./src"
os.makedirs(train_src_dir, exist_ok=True)
(図142)
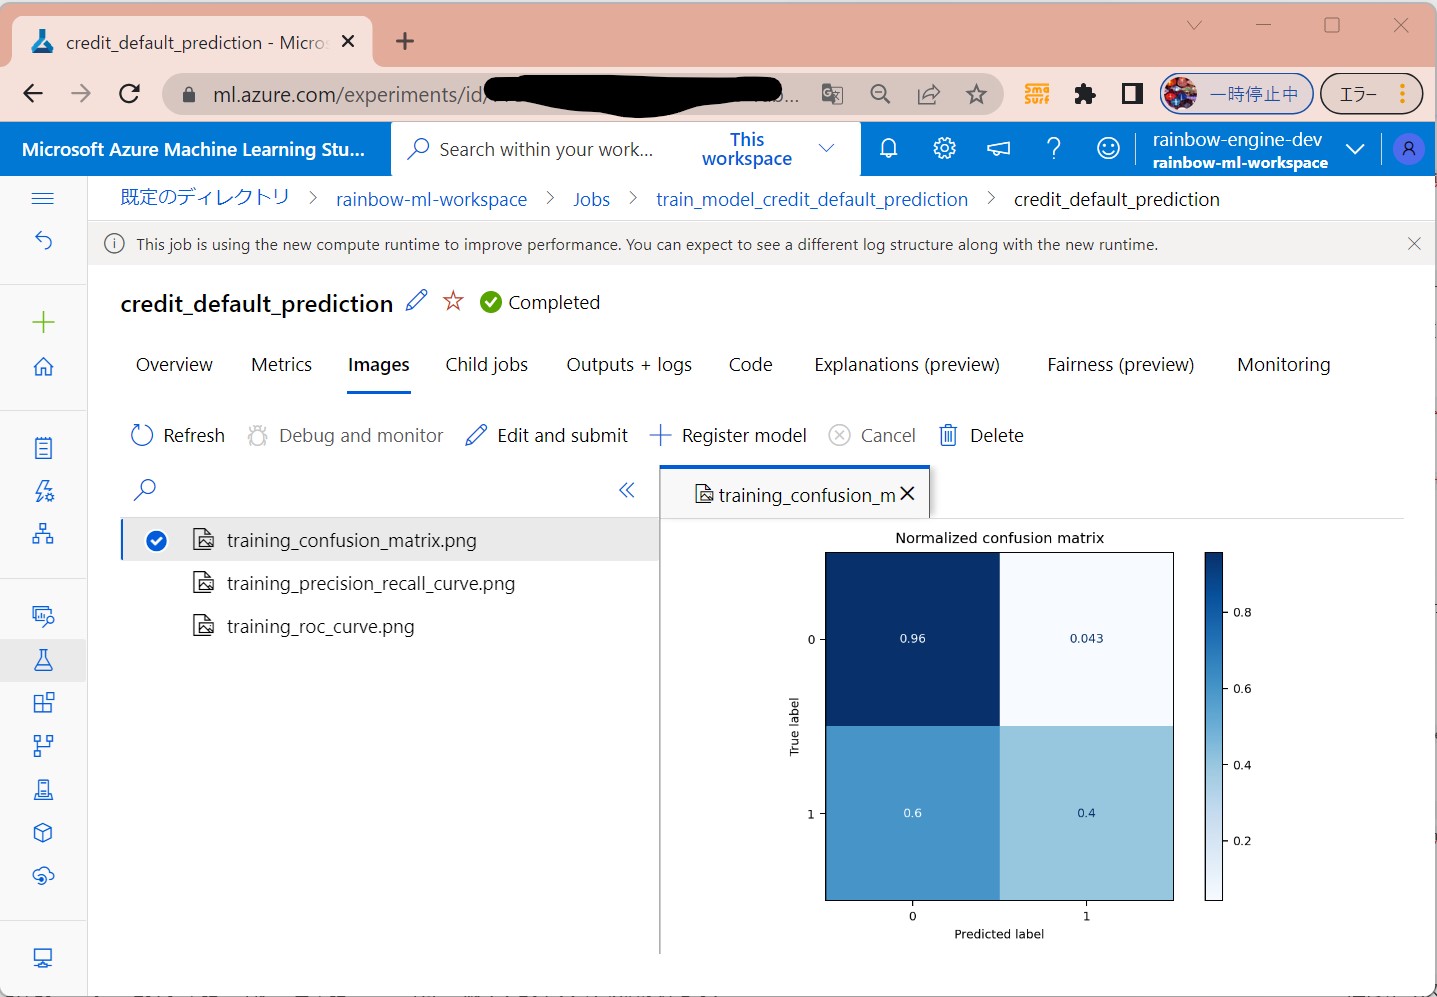
●STEP7-2:データ準備&モデルの学習
・データの前処理(引数の取得など)
・学習データとテストデータへの分離
・モデルの学習
・モデルの保存と登録 ⇒以降、エンドポイント経由で保存されたモデルが使える
(セル値)
%%writefile {train_src_dir}/main.py
import os
import argparse
import pandas as pd
import mlflow
import mlflow.sklearn
from sklearn.ensemble import GradientBoostingClassifier
from sklearn.metrics import classification_report
from sklearn.model_selection import train_test_split

def main():
    """Main function of the script."""

    # 入力/出力の引数
    parser = argparse.ArgumentParser()
    parser.add_argument("--data", type=str, help="path to input data")
    # 学習データ:テストデータ比率=0.75:0.25
    parser.add_argument("--test_train_ratio", type=float, required=False, default=0.25)
    parser.add_argument("--n_estimators", required=False, default=100, type=int)
    parser.add_argument("--learning_rate", required=False, default=0.1, type=float)
    parser.add_argument("--registered_model_name", type=str, help="model name")
    args = parser.parse_args()

    # ログ開始
    mlflow.start_run()
    # 自動ログの有効化
    mlflow.sklearn.autolog()
    ###################
    # データの準備START
    ###################
    print(" ".join(f"{k}={v}" for k, v in vars(args).items()))
    print("input data:", args.data)
    credit_df = pd.read_excel(args.data, header=1, index_col=0)
    mlflow.log_metric("num_samples", credit_df.shape[0])
    mlflow.log_metric("num_features", credit_df.shape[1] - 1)
    # データを「学習用」と「テスト用」に分離する(比率はtest_train_ratioの値)
    train_df, test_df = train_test_split(
        credit_df,
        test_size=args.test_train_ratio,
    )
    ####################
    # データの準備END
    ####################
    ##################
    # モデルの学習 START
    ##################
    # popで指定したカラムを抽出
    y_train = train_df.pop("default payment next month")
    # dataframeをarrayに変換
    X_train = train_df.values
    # popで指定したカラムを抽出
    y_test = test_df.pop("default payment next month")
    # dataframeをarrayに変換
    X_test = test_df.values
    print(f"Training with data of shape {X_train.shape}")
    # GradientBoostingClassifierは機械学習のアルゴリズム群
    clf = GradientBoostingClassifier(
        n_estimators=args.n_estimators, learning_rate=args.learning_rate
    )
    # 学習
    clf.fit(X_train, y_train)

    # テストの実行
    y_pred = clf.predict(X_test)
    # テスト結果の表示
    print(classification_report(y_test, y_pred))
    ###################
    # モデルの学習 END
    ###################

    ##########################
    # モデルの保存と登録
    ##########################
    # モデルをworkspaceに登録
    print("Registering the model via MLFlow")
    mlflow.sklearn.log_model(
        sk_model=clf,
        registered_model_name=args.registered_model_name,
        artifact_path=args.registered_model_name,
    )

    # モデルをファイルに保存
    mlflow.sklearn.save_model(
        sk_model=clf,
        path=os.path.join(args.registered_model_name, "trained_model"),
    )
    ###########################
    # モデルの保存と登録
    ###########################

    # ログ終了
    mlflow.end_run()

if __name__ == "__main__":
    main()
(図143)
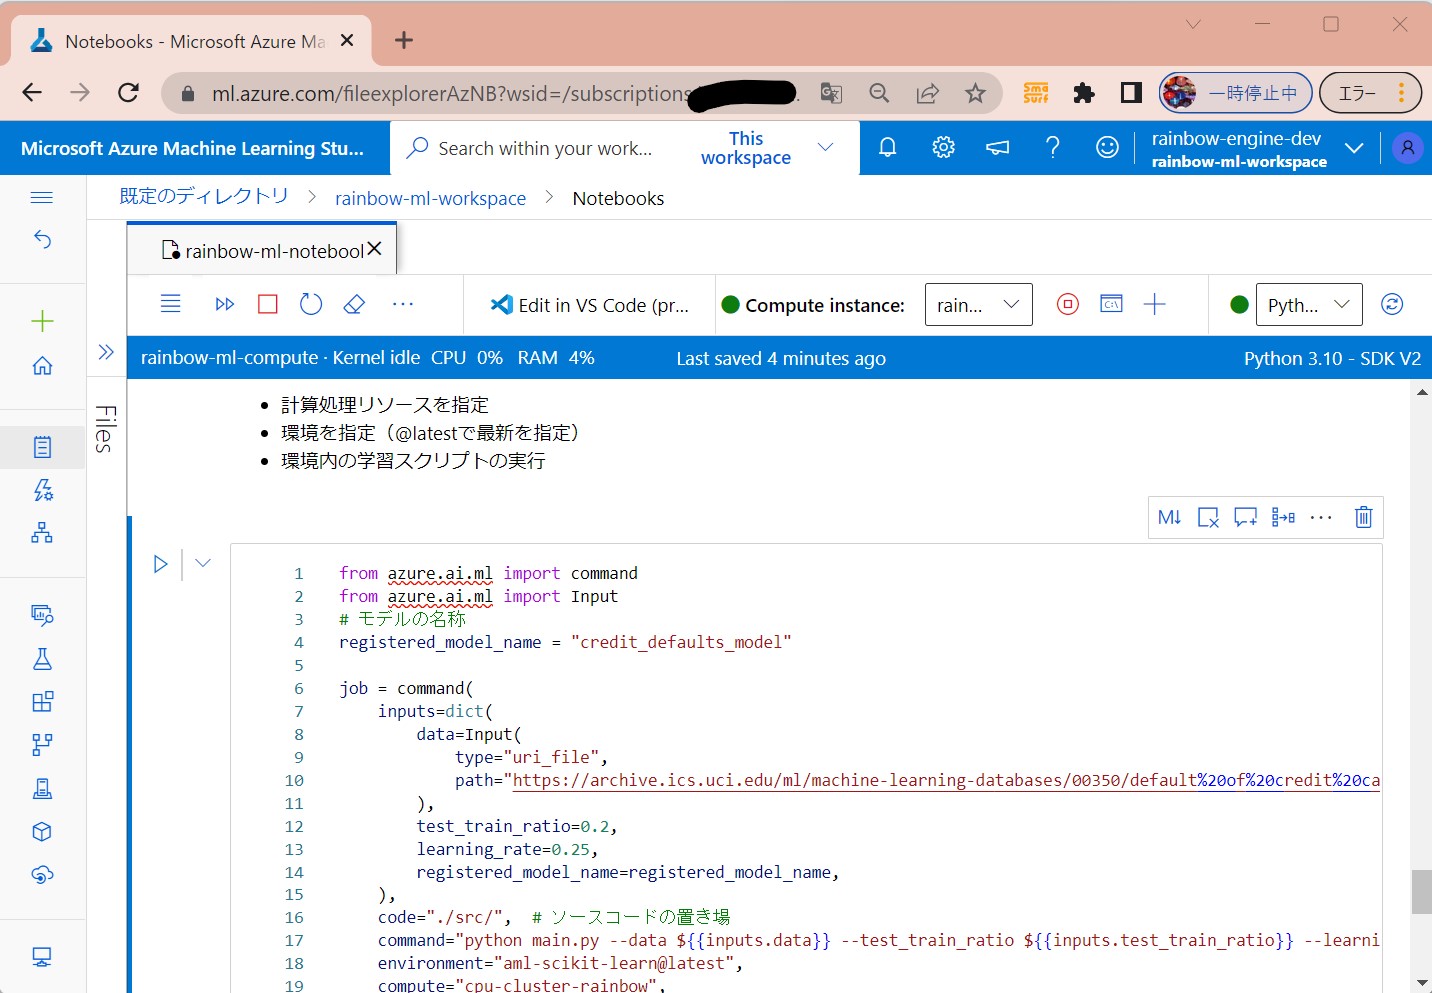
(1-8) STEP8:(処理記述)ジョブの実行コマンドを作成
●STEP8-1:ジョブ実行コマンドの定義
(処理概要)
・計算処理リソースを指定
・環境を指定(@latestで最新を指定)
・環境内の学習スクリプトの実行
・計算処理リソースを指定
・環境を指定(@latestで最新を指定)
・環境内の学習スクリプトの実行
(セル値)
from azure.ai.ml import command
from azure.ai.ml import Input
# モデルの名称
registered_model_name = "credit_defaults_model"

job = command(
    inputs=dict(
        data=Input(
            type="uri_file",
            path="https://archive.ics.uci.edu/ml/machine-learning-databases/00350/default%20of%20credit%20card%20clients.xls",
        ),
        test_train_ratio=0.2,
        learning_rate=0.25,
        registered_model_name=registered_model_name,
    ),
    code="./src/",  # ソースコードの置き場
    command="python main.py --data ${{inputs.data}} --test_train_ratio ${{inputs.test_train_ratio}} --learning_rate ${{inputs.learning_rate}} --registered_model_name ${{inputs.registered_model_name}}",
    # 作成した環境を指定
    environment="aml-scikit-learn@latest",
    # 作成したcomputeリソースを指定
    compute="cpu-cluster-rainbow",
    # 表示名称
    experiment_name="train_model_credit_default_prediction",
    display_name="credit_default_prediction",
)
(図144)
STEP8-2:ジョブの起動
(図145)

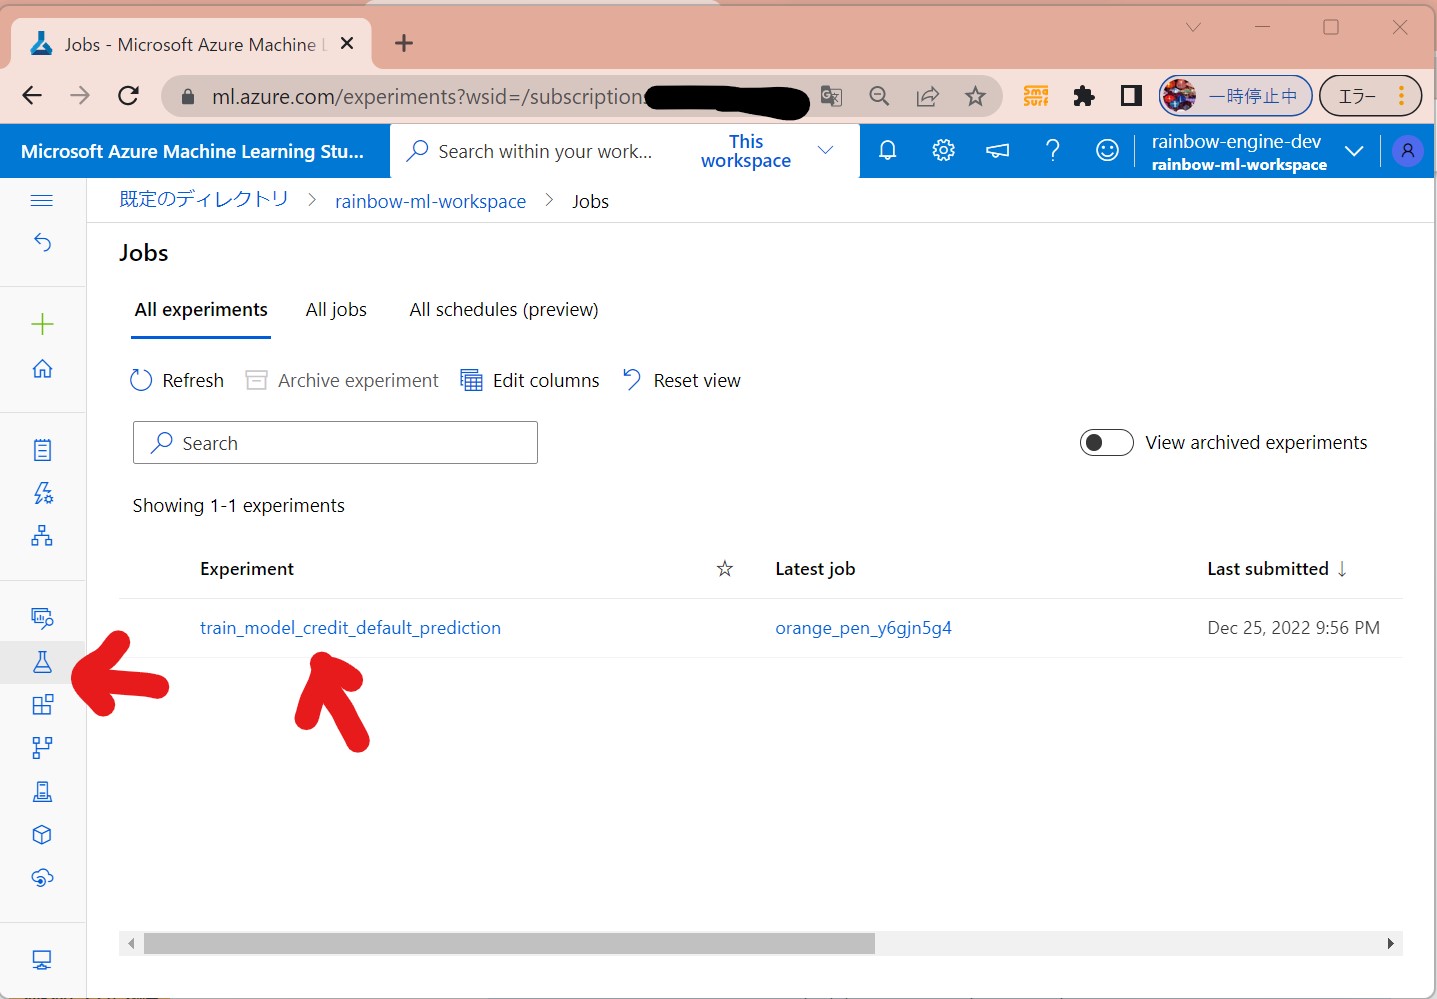
(1-9) STEP9:(処理実行)ジョブの実行/結果確認
(処理概要)
・①Dockerイメージを作成し、コンテナレジストリにアップロード(後の実行のためにキャッシュされる)
・②ノード不足の場合、スケールアウトする(ノード数を増やす)
・③src配下のスクリプトが実行され、標準出力や./logs配下がジョブモニターで見れる。
(図151①)
↓
例1
(図151②)

↓
例2
(図151③)
(1-10) STEP10:(公開準備)エンドポイントの作成
・オンラインのエンドポイントを作成します
・名前はリージョン間で一意にすべき
(セル値)
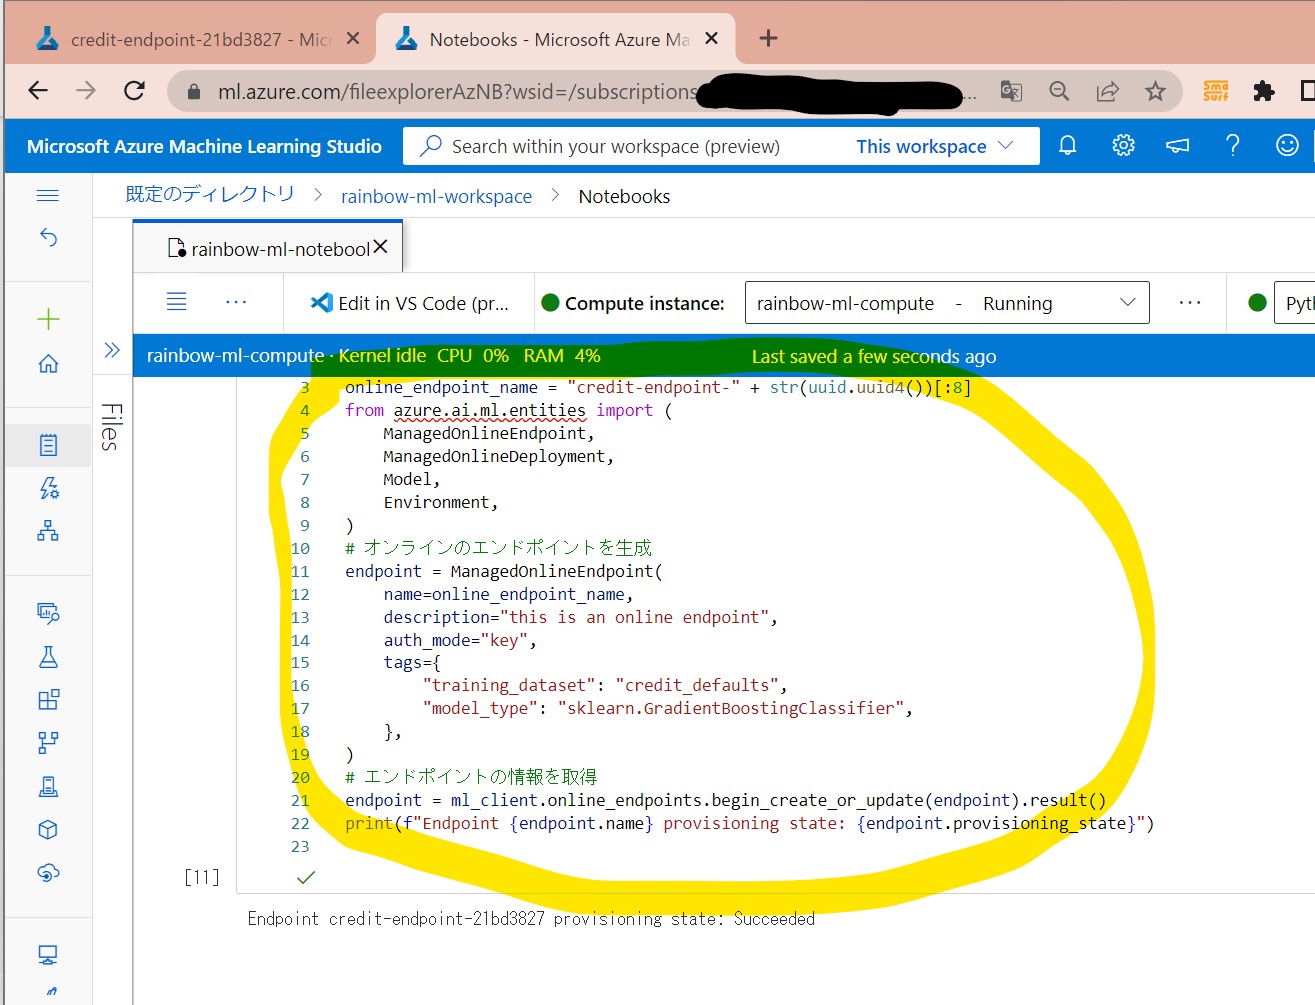
↓
import uuid
# エンドポイントの一意な名前を生成(8桁)
online_endpoint_name = "credit-endpoint-" + str(uuid.uuid4())[:8]
from azure.ai.ml.entities import (
    ManagedOnlineEndpoint,
    ManagedOnlineDeployment,
    Model,
    Environment,
)
# オンラインのエンドポイントを生成
endpoint = ManagedOnlineEndpoint(
    name=online_endpoint_name,
    description="this is an online endpoint",
    auth_mode="key",
    tags={
        "training_dataset": "credit_defaults",
        "model_type": "sklearn.GradientBoostingClassifier",
    },
)
# エンドポイントの情報を取得
endpoint = ml_client.online_endpoints.begin_create_or_update(endpoint).result()
print(f"Endpoint {endpoint.name} provisioning state: {endpoint.provisioning_state}")
(図161①)設定
↓
(図161②)エンドポイントが生成された
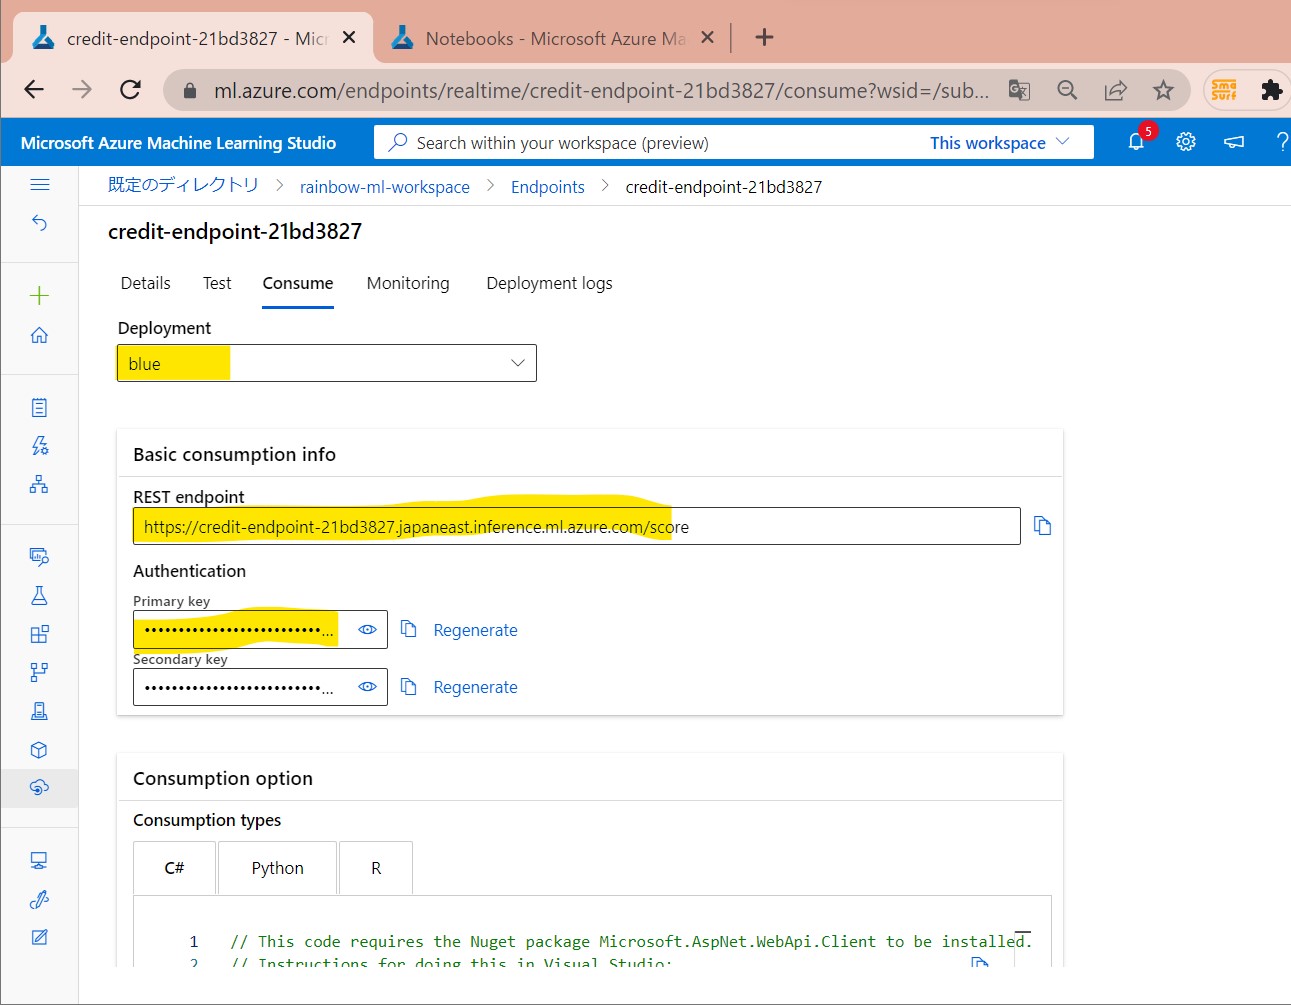
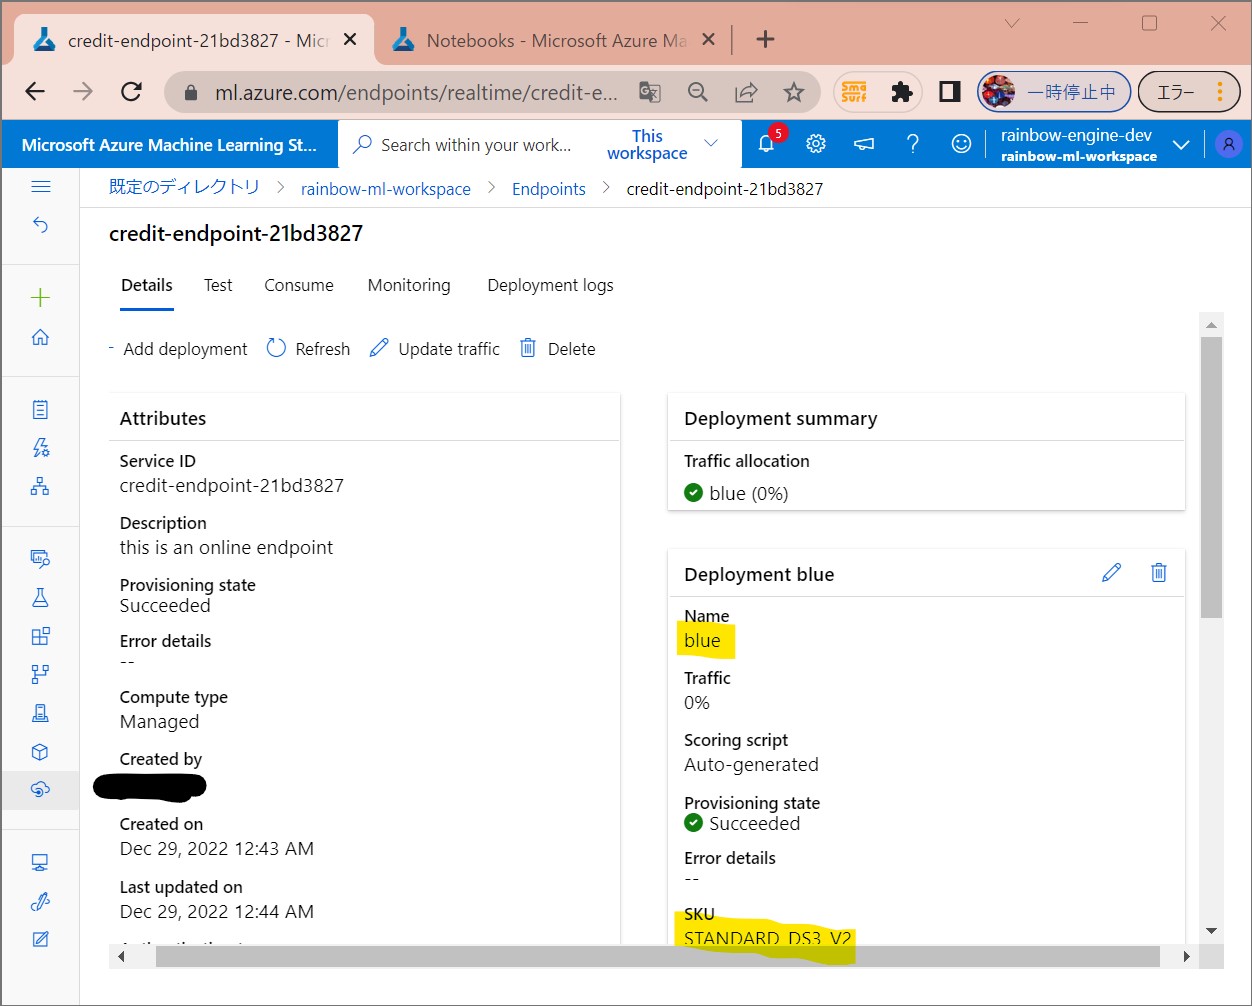
(1-11) STEP11:(公開準備)エンドポイントへデプロイ
・エンドポイントに対して、モデルを「Webサービス」としてデプロイする
→REST APIに入力データを渡してhttpリクエストを送ると、モデルを実行し、処理結果を返却
・エンドポイントには複数のデプロイが可能
→青90%、緑10%などのトラフィック制御も可能。
(セル値)
# 最新verのmodelを取得
latest_model_version = max(
    [int(m.version) for m in ml_client.models.list(name=registered_model_name)]
)
# デプロイ対象のmodelを選択。
# 今回は登録済モデルの最新版を使用
model = ml_client.models.get(name=registered_model_name, version=latest_model_version)

# オンラインデプロイの生成
blue_deployment = ManagedOnlineDeployment(
    name="blue",
    endpoint_name=online_endpoint_name,
    model=model,
    instance_type="Standard_DS3_v2",
    instance_count=1,
)
blue_deployment = ml_client.begin_create_or_update(blue_deployment).result()
(図171)
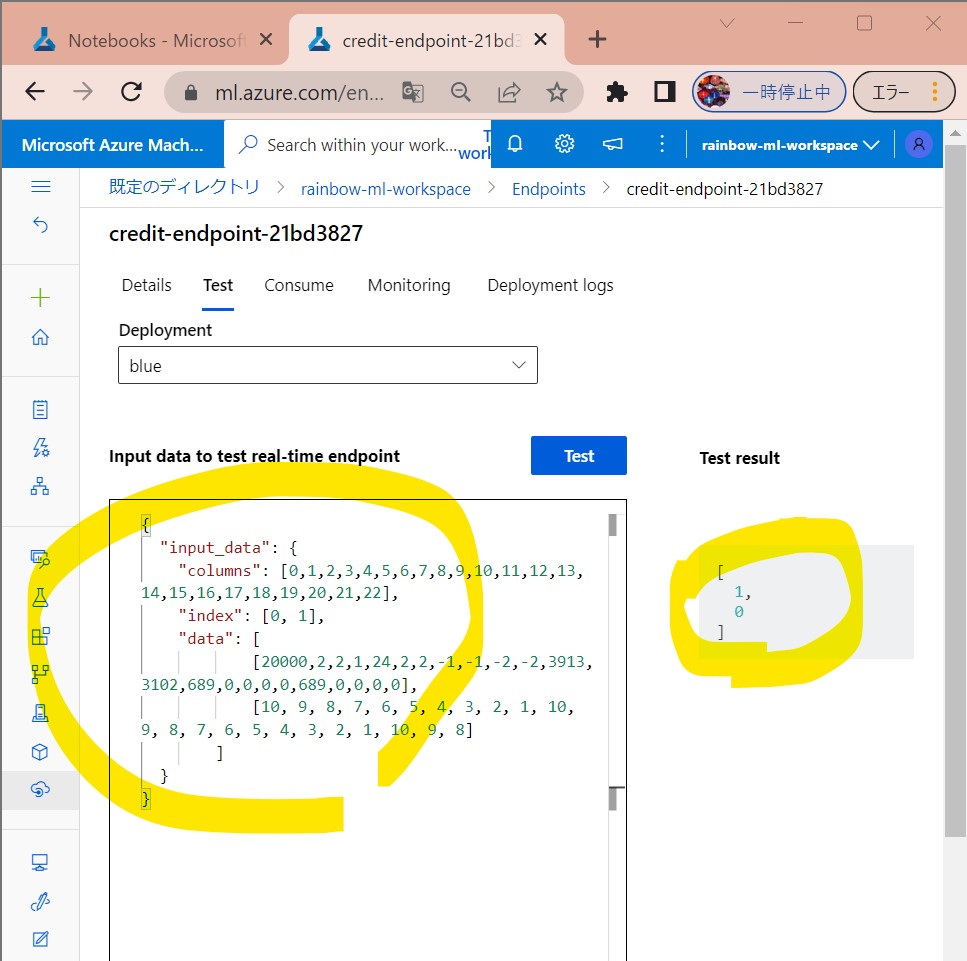
(1-12) STEP12:(公開準備)テスト
・サンプルクエリを用いてテスト
(サンプルクエリ)
deploy_dir = "./deploy"
os.makedirs(deploy_dir, exist_ok=True)
%%writefile {deploy_dir}/sample-request.json
{
  "input_data": {
    "columns": [0,1,2,3,4,5,6,7,8,9,10,11,12,13,14,15,16,17,18,19,20,21,22],
    "index": [0, 1],
    "data": [
            [20000,2,2,1,24,2,2,-1,-1,-2,-2,3913,3102,689,0,0,0,0,689,0,0,0,0],
            [10, 9, 8, 7, 6, 5, 4, 3, 2, 1, 10, 9, 8, 7, 6, 5, 4, 3, 2, 1, 10, 9, 8]
        ]
  }
}
# サンプルデータで、青デプロイをテスト
ml_client.online_endpoints.invoke(
    endpoint_name=online_endpoint_name,
    request_file="./deploy/sample-request.json",
    deployment_name="blue",
)
↓テストはGUIからも行えます。
(図172)
(1-13) STEP13:(後処理)リソースの削除
高額のため、実験で使い終わったら削除しておくのが無難。
オマケ:APIアクセス
→(参考)Azure Machine LearningでデプロイしたモデルからAPI経由でデータ取得(★準備中)