<目次>
(1) Azure Machine LearningでDataStoreを作成してAzure Storage File Shares(ファイル共有)のデータを操作する方法
(0-1) やりたいこと
(1-0) STEP0:前提条件(例)
(1-1) STEP1:ワークスペースへの接続
(1-2) STEP2:DataStoreの生成
(1-3) STEP3:DataStoreを経由したデータアクセス処理の記述
(1-4) STEP4:実行と結果確認
(1) Azure Machine LearningでDataStoreを作成してAzure Storage File Shares(ファイル共有)のデータを操作する方法
(0-1) やりたいこと
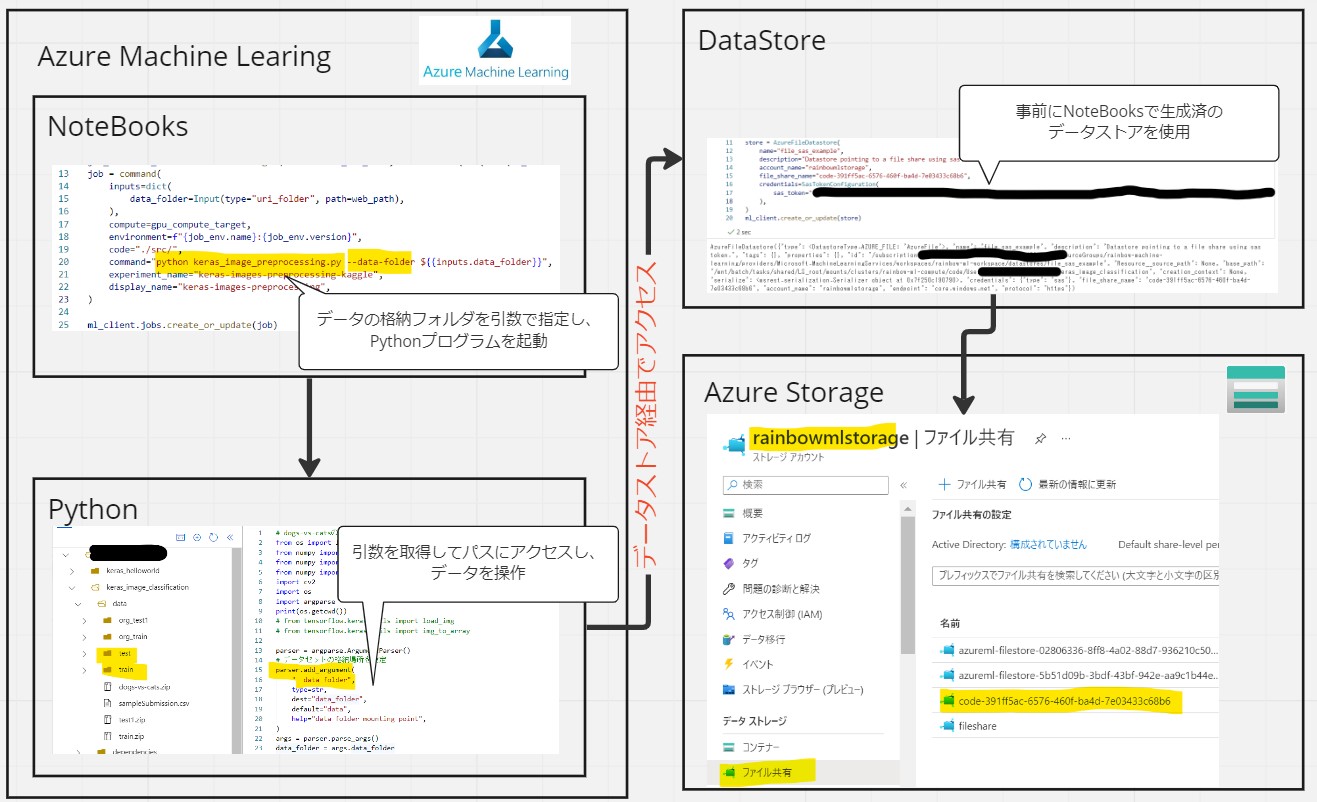
・Azure Machine LearningからAzure Storage File Shares(ファイル共有)のファイル(例:画像データ)に「DataStore」経由でアクセスしたい。
(図100)
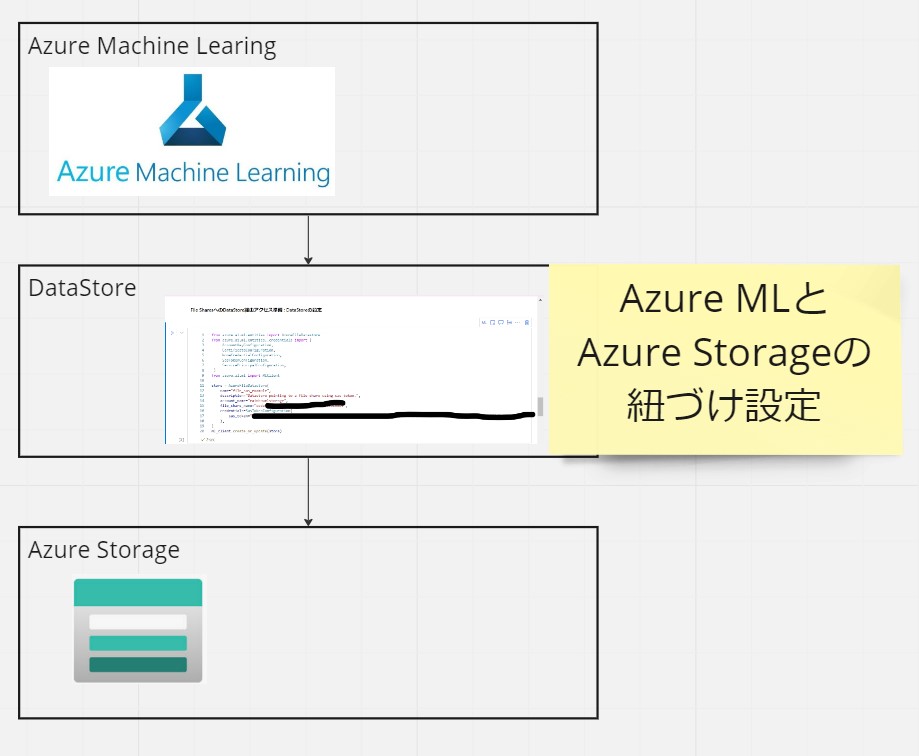
・MS公式サイトによると、DataStoreは既存のStorage AccountをAzure Machine Learningで使えるようにするための『紐づけ設定』の様な位置づけです。
(図101)
(1-0) STEP0:前提条件(例)
まだの方は下記記事に沿って実施頂けたらと思います。
→(手順)Azure Machine LearningでKerasを用いたモデルを作成~公開する手順(★準備中)
●STEP0-1:Azure Machine Learning
・Azure Machine Learningのリソースが作成済
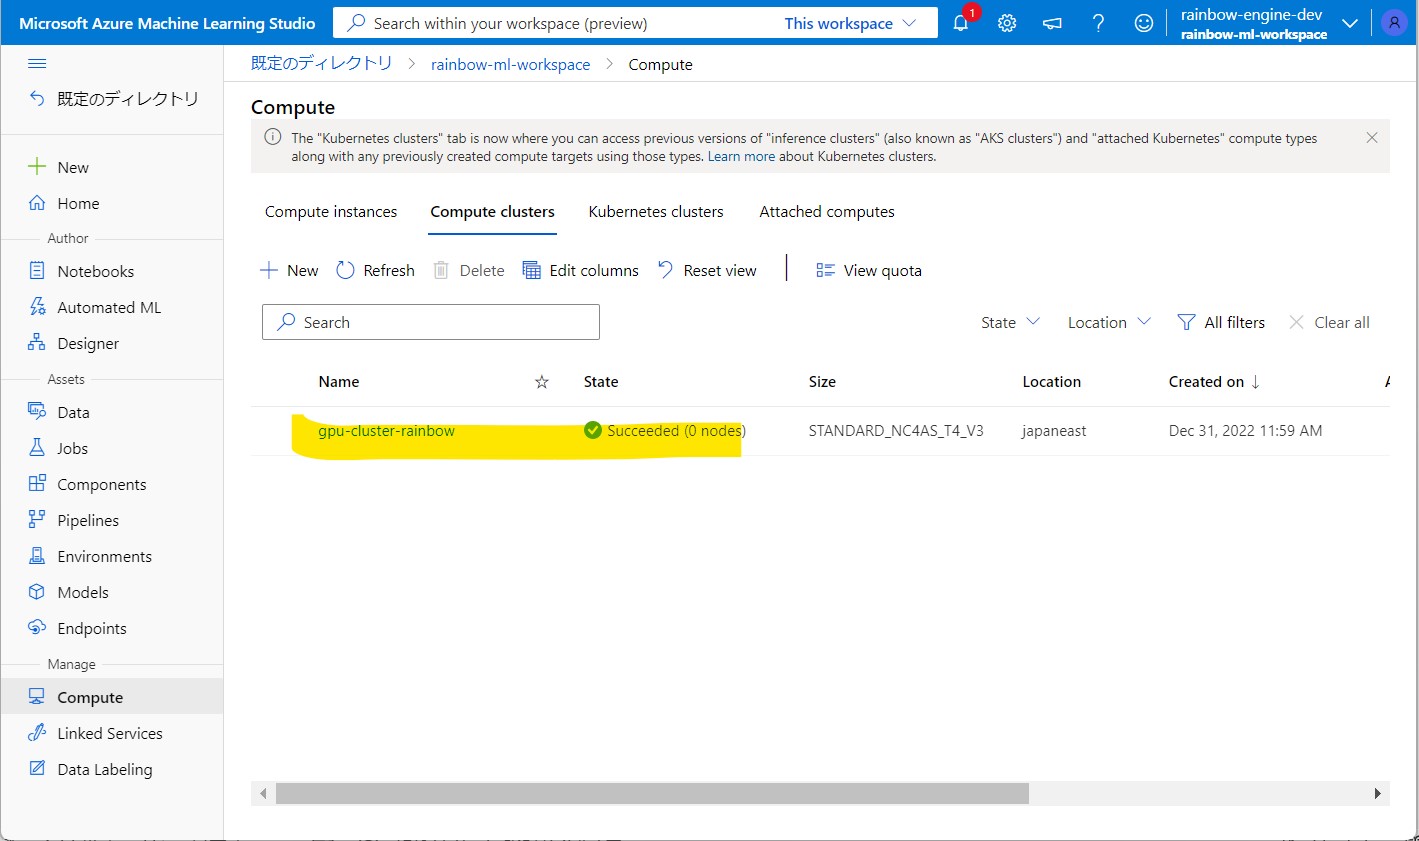
・Compute clustersも作成済
(図111)Compute clustersの例
●STEP0-2:Azure Storage
・Azure Storage File Shares(ファイル共有)が作成済
・上記がAzure Machine Learningと紐づいている
(図112)Azure Storageのファイル共有の例

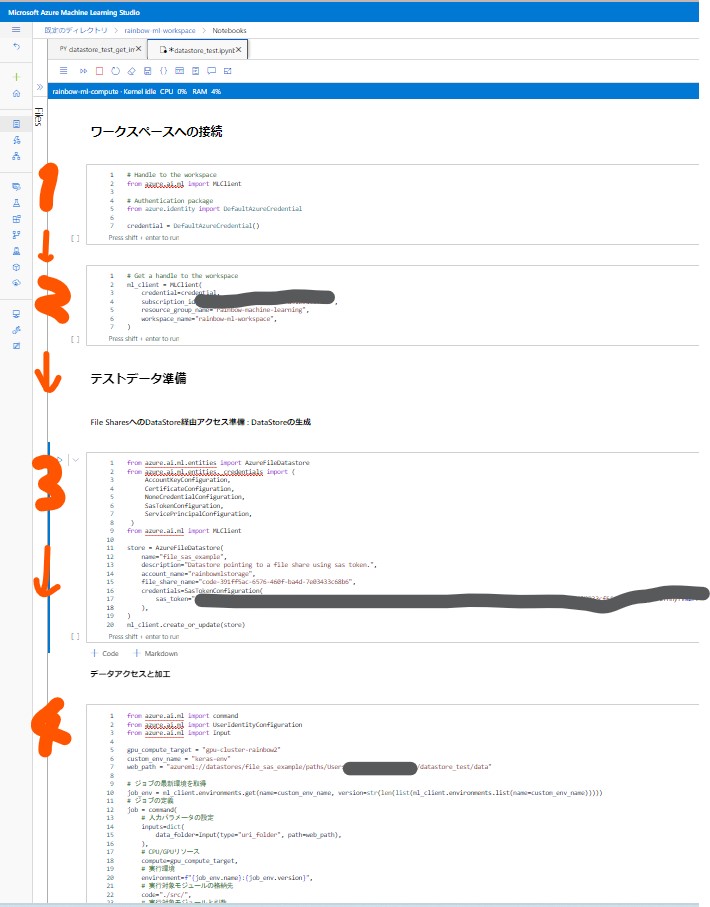
(1-1) STEP1:ワークスペースへの接続
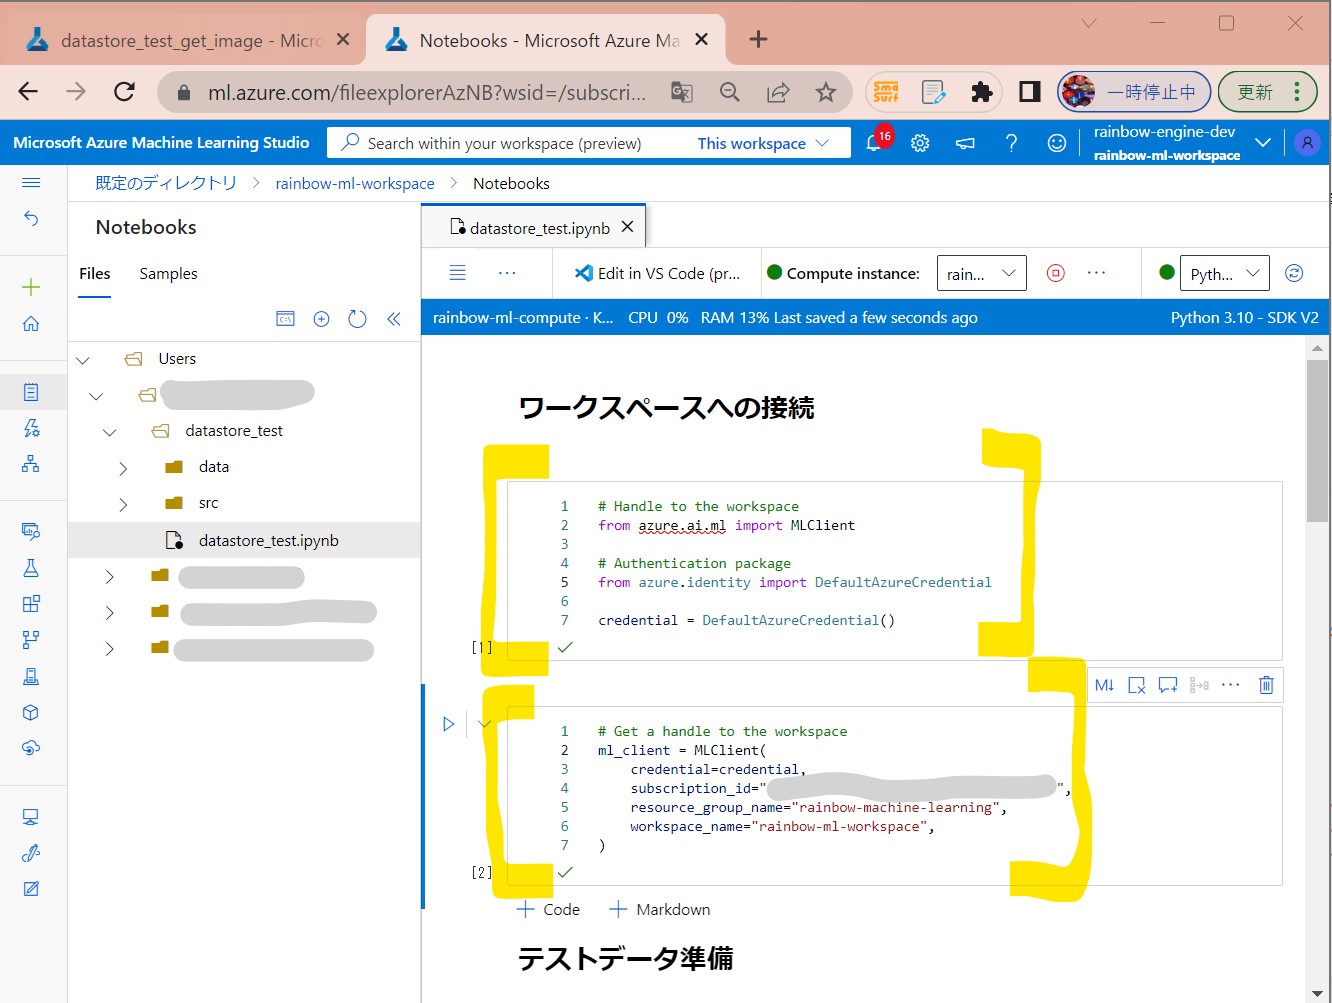
・①下記コードをAzure Machine LearningのNotebooksのセルに入力します。
(セル値1-1)

# Handle to the workspace
from azure.ai.ml import MLClient
# Authentication package
from azure.identity import DefaultAzureCredential
credential = DefaultAzureCredential()
(セル値1-2)
# Get a handle to the workspace
ml_client = MLClient(
    credential=credential,
    subscription_id="[サブスクリプションID]",
    resource_group_name="[Azure Machine Learningのリソースグループ名]",
    workspace_name="[Azure Machine Learningのワークスペース名]",
)
(図121)
(1-2) STEP2:DataStoreの生成
Azure Machine Learningのワークスペースと紐づいている既存のStorage Accountにアクセスするための「データストア」を生成します。
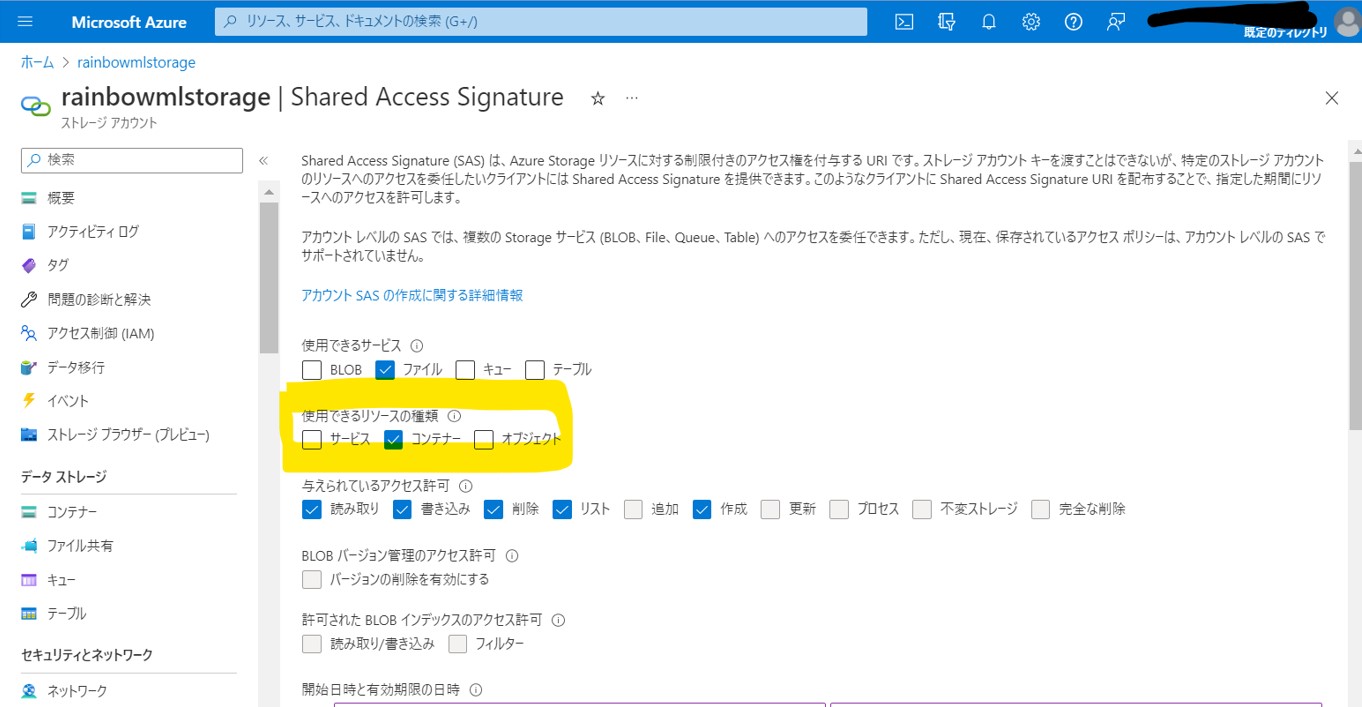
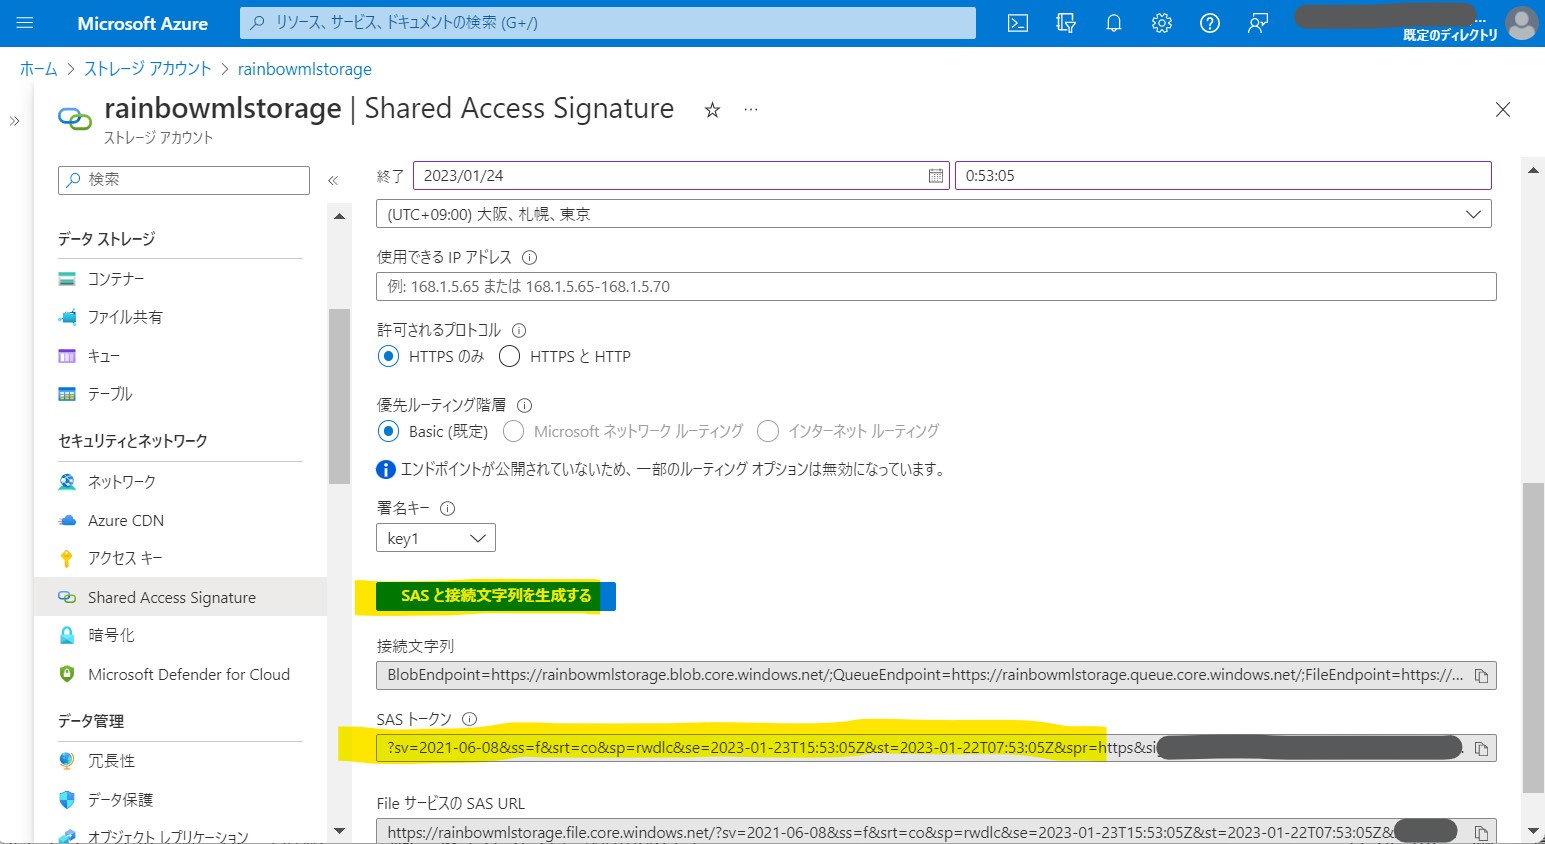
●STEP2-1:Azure Storage側で、SASトークンを生成
・①Azure Machine Learningと紐づくAzure Storageを開き「Shared Access Signature」ブレードを選択。
(図122①)

↓
・②用途に応じて必要な内容を入力
・サービス=BLOB、ファイルを選択
・リソース=コンテナ、オブジェクトを選択
(図122②)
(補足)設定の理由
⇒(参考)Azure StorageでSASトークン発行時の「使用できるリソースの種類」の意味について(★準備中)
↓
・③「SASと接続文字列を生成する」を押下
→「SASトークン」はNotebooksの実装で使うので控える。
(図122③)
↓
・④ファイル共有名(file_share_name)の確認
(図122④)Azure Storageの「ファイル共有」

この記事ではファイル共有名「code-391ff5ac-6576-460f-ba4d-7e03433c68b6」をDataStore作成時の「file_share_name」で使用します。
●STEP2-2:Azure Machine LearningのNotebooksの実装
・①下記コードをAzure Machine LearningのNotebooksのセルに入力します。
(セル値2-1)
from azure.ai.ml.entities import AzureFileDatastore
from azure.ai.ml.entities._credentials import (
     AccountKeyConfiguration,
     CertificateConfiguration,
     NoneCredentialConfiguration,
     SasTokenConfiguration,
     ServicePrincipalConfiguration,
 )
from azure.ai.ml import MLClient

store = AzureFileDatastore(
    name="file_sas_example",
    description="Datastore pointing to a file share using sas token.",
    account_name="[ご自身のストレージアカウント名]",
    file_share_name="[ご自身のストレージアカウントのファイル共有名]",
    credentials=SasTokenConfiguration(
        sas_token="[ご自身のSAS Token]"
    ),
)
ml_client.create_or_update(store)
(図131)
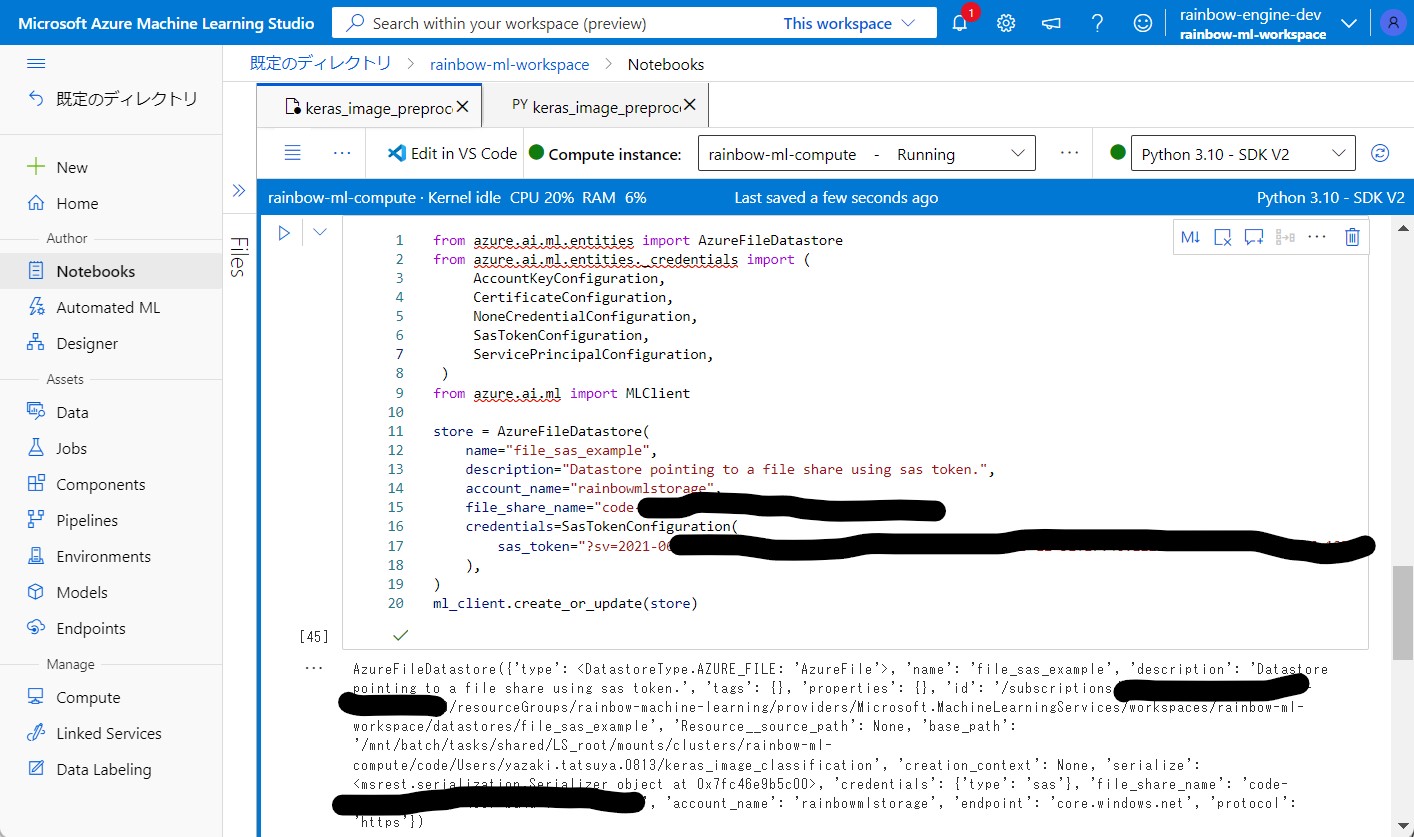
(結果例)
AzureFileDatastore({
'type': ,
'name': 'file_sas_example',
'description': 'Datastore pointing to a file share using sas token.',
'tags': {},
'properties': {},
'id': '/subscriptions/xxxxx/resourceGroups/rainbow-machine-learning/providers/Microsoft.MachineLearningServices/workspaces/rainbow-ml-workspace/datastores/file_sas_example',
'Resource__source_path': None,
'base_path': '/mnt/batch/tasks/shared/LS_root/mounts/clusters/rainbow-ml-compute/code/Users/xxxxx/keras_image_classification',
'creation_context': None,
'serialize': ,
'credentials': {'type': 'sas'},
'file_share_name': 'code-391ff5ac-6576-460f-ba4d-7e03433c68b6',
'account_name': 'rainbowmlstorage',
'endpoint': 'core.windows.net',
'protocol': 'https'})
(1-3) STEP3:DataStoreを経由したデータアクセス処理の記述
●STEP3-1:Azure Machine LearningのNotebooksの実装
・①下記コードをAzure Machine LearningのNotebooksのセルに入力します。
(セル値3-1)
from azure.ai.ml import command
from azure.ai.ml import UserIdentityConfiguration
from azure.ai.ml import Input

gpu_compute_target = "[ご自身のCompute clusters名]"
custom_env_name = "keras-env"
web_path = "azureml://datastores/file_sas_example/paths/Users/[ご自身のデータ格納先パス]"

# ジョブの最新環境を取得
job_env = ml_client.environments.get(name=custom_env_name, version=str(len(list(ml_client.environments.list(name=custom_env_name)))))
# ジョブの定義
job = command(
    # 入力パラメータの設定
    inputs=dict(
        data_folder=Input(type="uri_folder", path=web_path),
    ),
    # CPU/GPUリソース
    compute=gpu_compute_target,
    # 実行環境
    environment=f"{job_env.name}:{job_env.version}",
    # 実行対象モジュールの格納先
    code="./src/",
    # 実行対象モジュールと引数
    command="python datastore_test_get_image.py --data-folder ${{inputs.data_folder}}",
    experiment_name="datastore_test_get_image",
    display_name="datastore_test_get_image",
)
# ジョブの実行
ml_client.jobs.create_or_update(job)
CPUクラスター、実行環境、データ格納先などを指定して、データアクセス用のPythonプログラムを呼び出しする処理です。実行するとJOBが生成され、JOBメニューから状況をモニタリングできます。
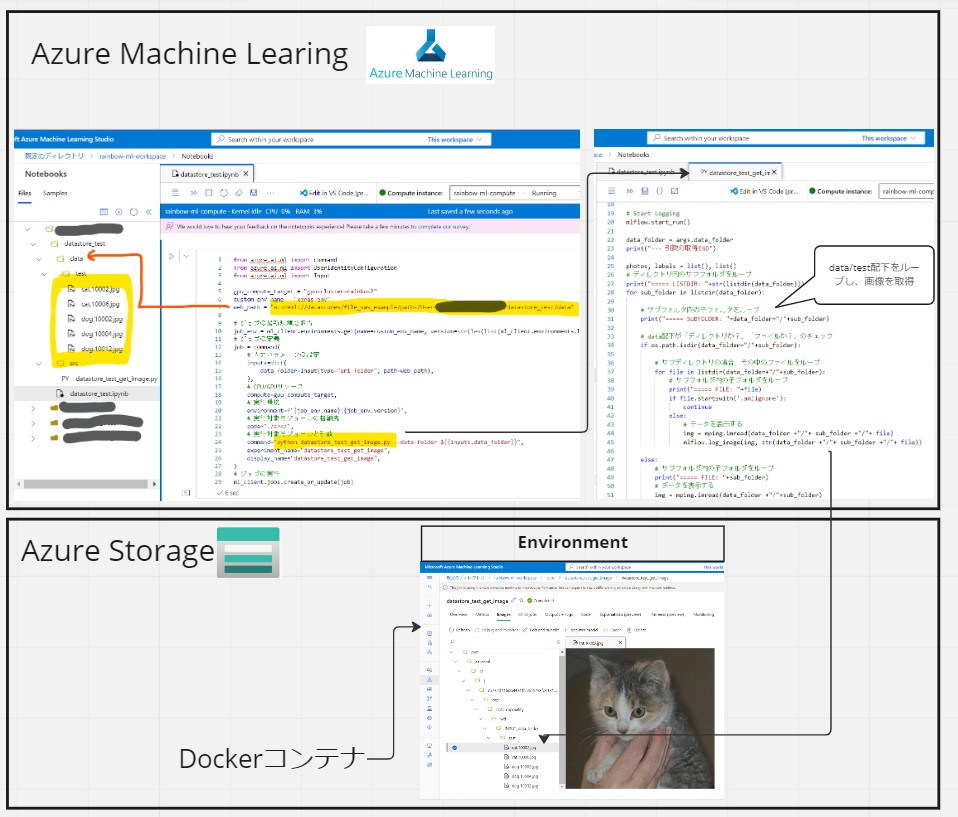
また、web_pathで指定したパスは環境(Dockerコンテナ)側にもマウントされて、アクセスが可能になります。
(図141)

●STEP3-2:NoteBooks経由で呼び出すPythonプログラムの実装
ここで、ジョブとして実行する処理(画像の処理や、モデル学習など)を記述します。今回は疎通確認用の処理として以下を行います。
(例)引数を受け取って、画像を(Azure MLワークスペースから)取得して、環境内(Dockerコンテナ)に保存してみる
(図142)
・①下記コードをAzure Machine LearningのNotebooksのセルに入力します。
(サンプルプログラム)datastore_test_get_image.py
from os import listdir
import os
import argparse
import matplotlib.image as mpimg
import mlflow

print("--- 引数の取得START")
parser = argparse.ArgumentParser()
# データセットの格納場所を設定
parser.add_argument(
    "--data-folder",
    type=str,
    dest="data_folder",
    default="data",
    help="data folder mounting point",
)
args = parser.parse_args()

# Start Logging
mlflow.start_run()

data_folder = args.data_folder
print("--- 引数の取得END")

photos, labels = list(), list()
# ディレクトリ内のサブフォルダをループ
print("===== LISTDIR: "+str(listdir(data_folder)))
for sub_folder in listdir(data_folder):

    # サブフォルダ内の子フォルダをループ
    print("===== SUBFOLDER: "+data_folder+"/"+sub_folder)

    # data配下が「ディレクトリか?」「ファイルか?」のチェック
    if os.path.isdir(data_folder+"/"+sub_folder):

        # サブディレクトリの場合、その中のファイルをループ
        for file in listdir(data_folder+"/"+sub_folder):
            # サブフォルダ内の子フォルダをループ
            print("===== FILE: "+file)
            if file.startswith('.amlignore'):
                continue
            else:
                # データを保存する
                img = mpimg.imread(data_folder +"/"+ sub_folder +"/"+ file)
                mlflow.log_image(img, str(data_folder +"/"+ sub_folder +"/"+ file))

    else:
        # サブフォルダ内の子フォルダをループ
        print("===== FILE: "+sub_folder)
        # データを保存する
        img = mpimg.imread(data_folder +"/"+sub_folder)
        mlflow.log_image(img, str(data_folder +"/"+sub_folder))

mlflow.end_run()
これはAzure MLのワークスペース内にある画像を、Pythonプログラム内で読み取り、機械学習の環境であるDockerコンテナ内に保存する処理です(特に意味ナシ、疎通目的)。
(図143)
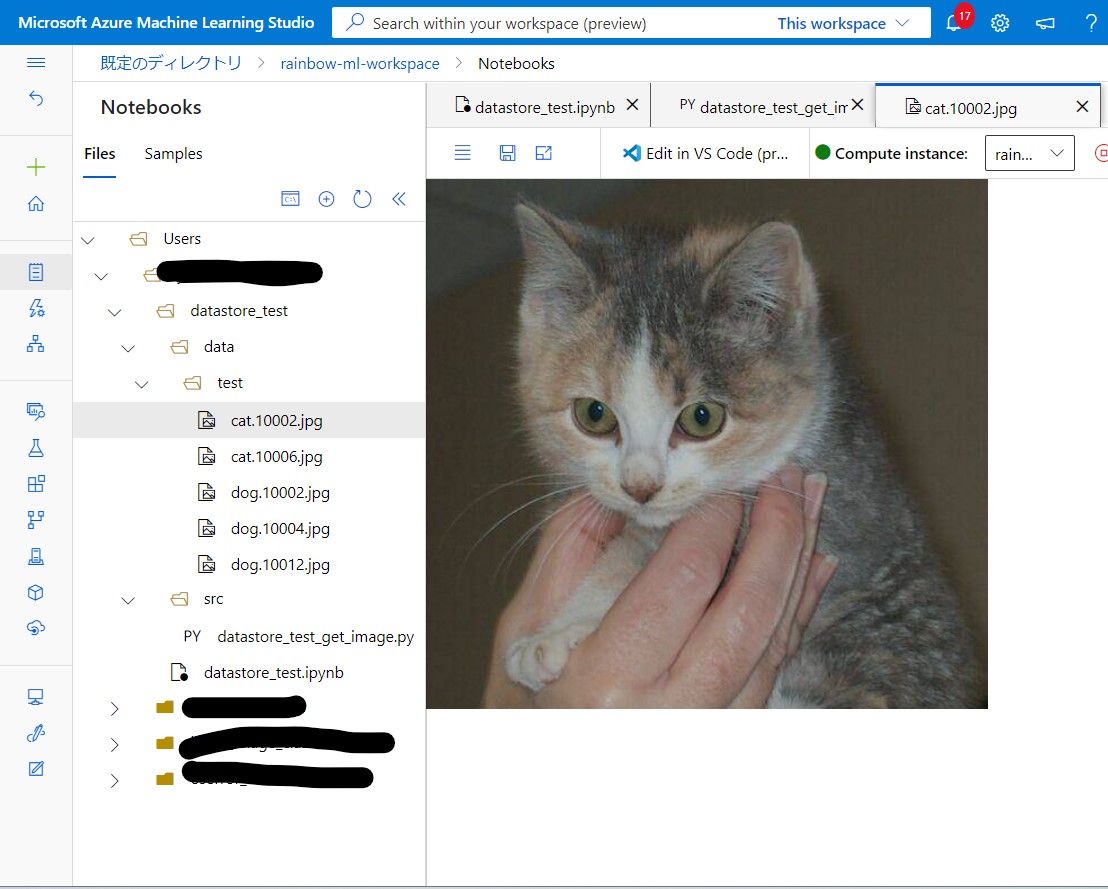
(1-4) STEP4:実行と結果確認
●STEP4-1:セルを順番に実行
・認証 ⇒ DataStore作成 ⇒ ジョブ作成と順番に実行していきます。
(図144)
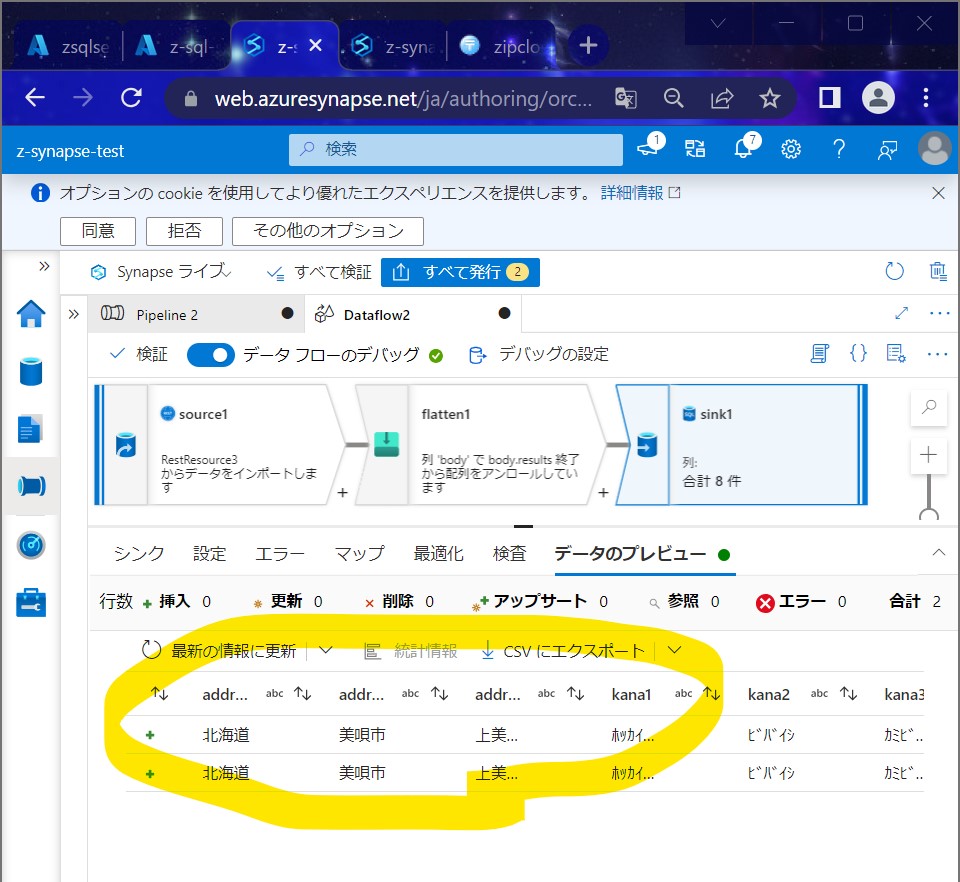
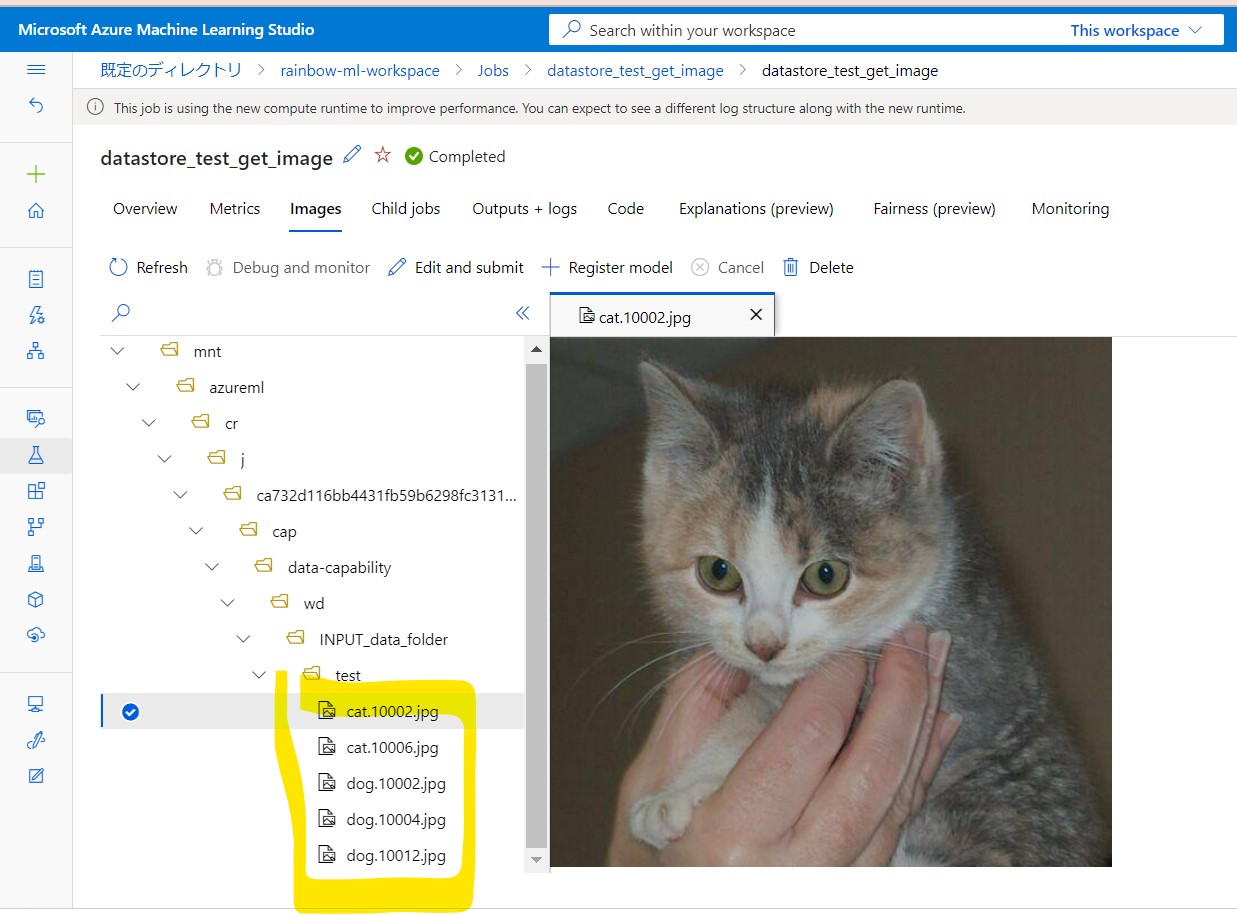
●STEP4-2:結果確認
⇒Dockerコンテナ内にも、犬と猫の画像が保存されました
(図145)
(参考)
・①基本知識
・②認証部分